

Advertiser user guide
From signing up and writing a campaign brief to inviting creators, confirming bookings, reviewing content and verifying posts.
Please note This guide walks through the real screens using test accounts and sample data. Names, statuses and amounts on the screens are examples, not proof of any payment or advertising result. Card payment is not connected yet, so only barter campaigns run and no money changes hands.
Contents
- 01Home and sign-in
- 02Create an advertiser account
- 03Explore the dashboard
- 04Write a campaign brief
- 05Review the suggested plan
- 06Adjust your conditions
- 07Set barter terms
- 08Send a creator offer
- 09Track offer status
- 10Browse creators directly
- 11Confirm a booking
- 12Share the tracking link
- 13(Optional) Record coupon use at the till
- 14Review submitted content
- 15Verify the published post
- 16Completion and feedback
- 17Read the performance report
- 18Review open-campaign applicants
- 19Respond to a counteroffer
Home and sign-in
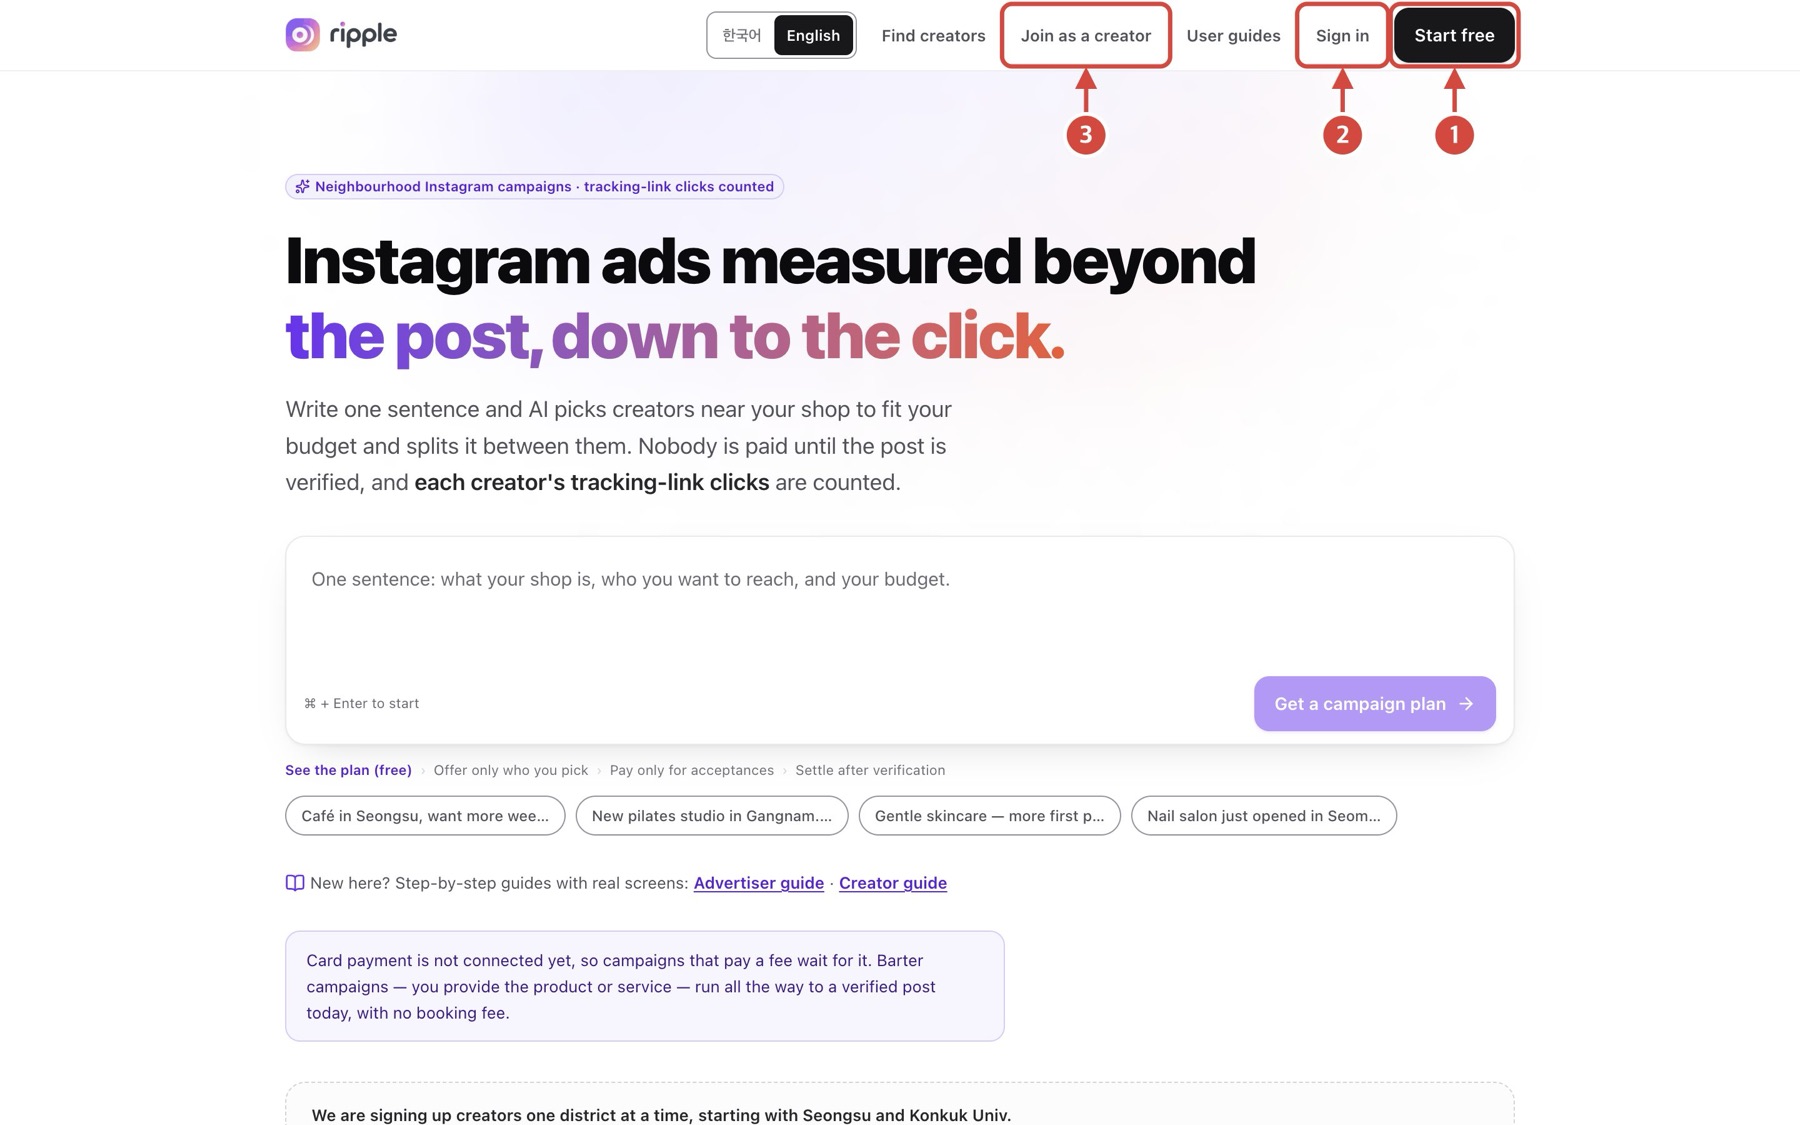
Tap the image to view it full size
- 1Select “Start free” to create an advertiser account.
- 2Select “Sign in” if you already have an account.
- 3“Join as a creator” is for creator sign-up.
Next You can also describe your shop and goal on the home page to get a campaign plan.
Back to topCreate an advertiser account
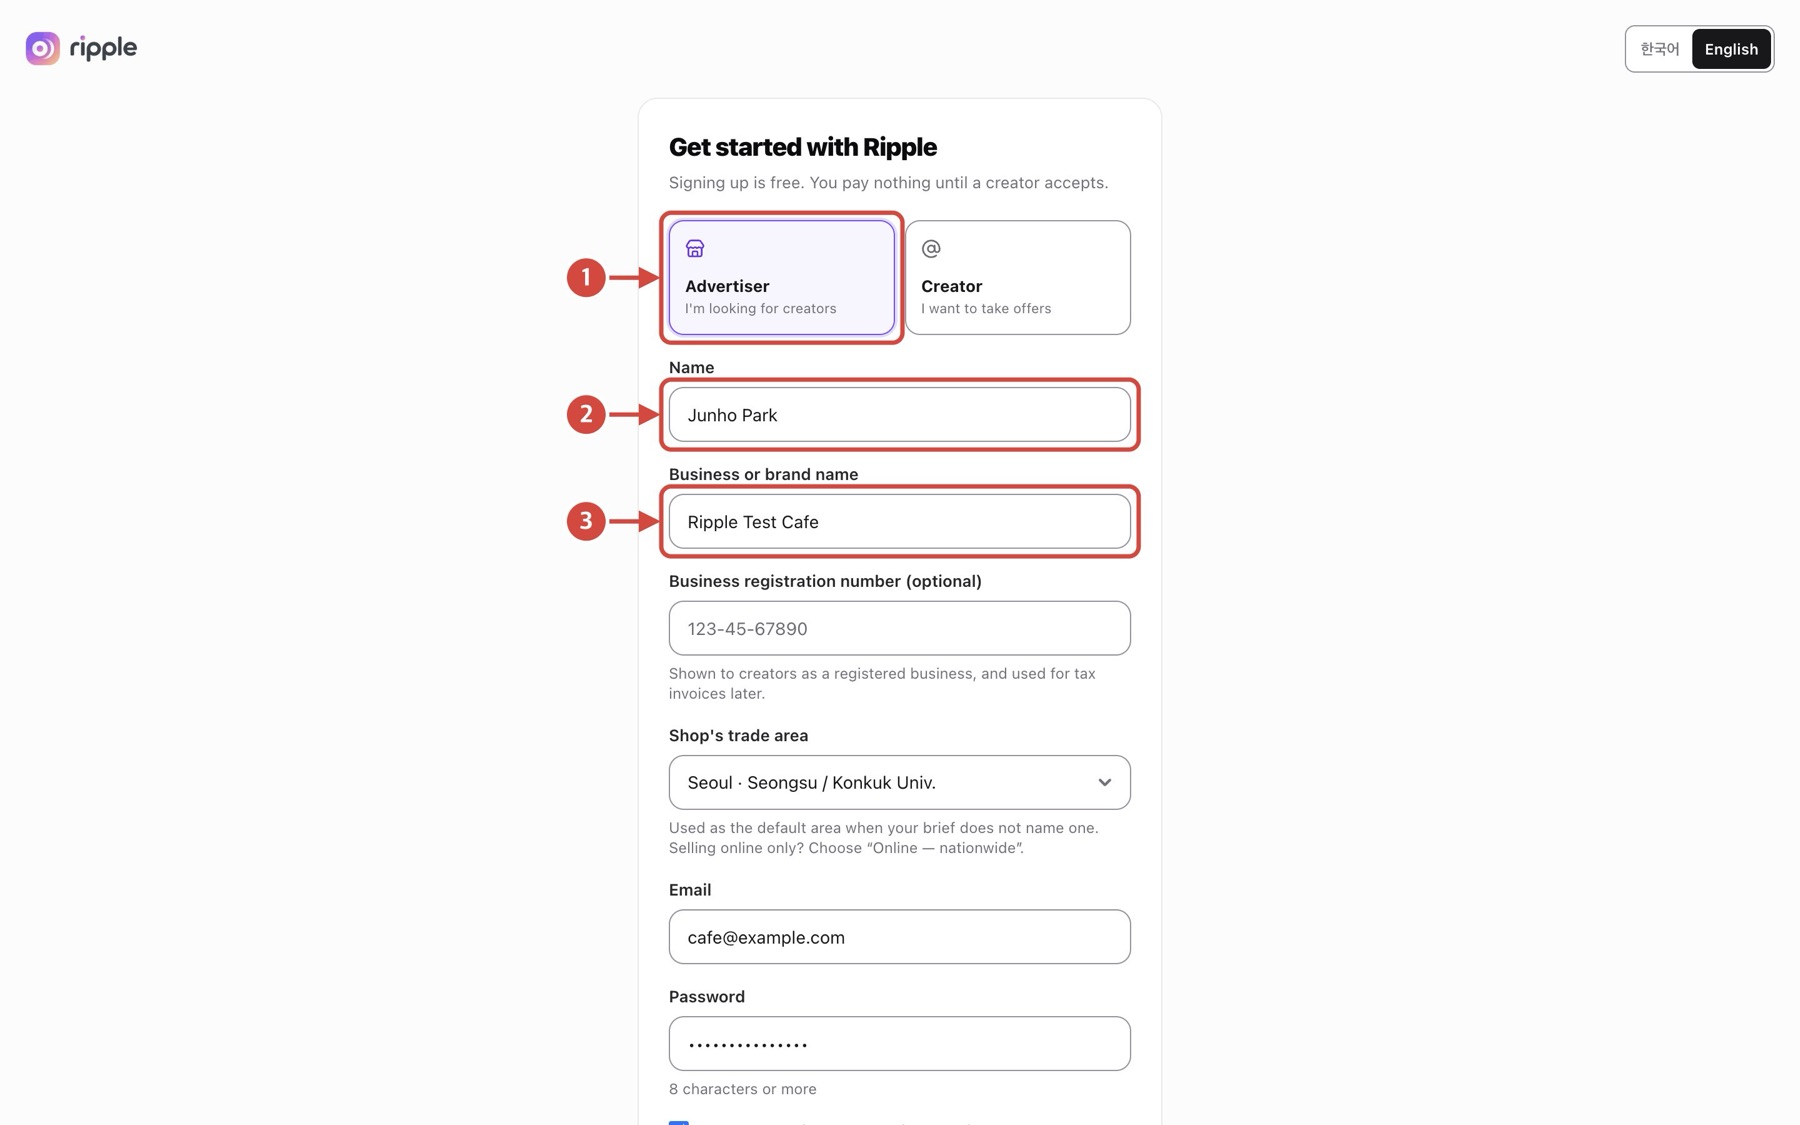
Tap the image to view it full size
- 1Select “Advertiser”.
- 2Enter your name.
- 3Enter your business or brand name.
Next Then choose your shop's trade area, enter your email and password, accept the required terms and select “Sign up and create a campaign”. The business registration number is optional.
Back to topExplore the dashboard
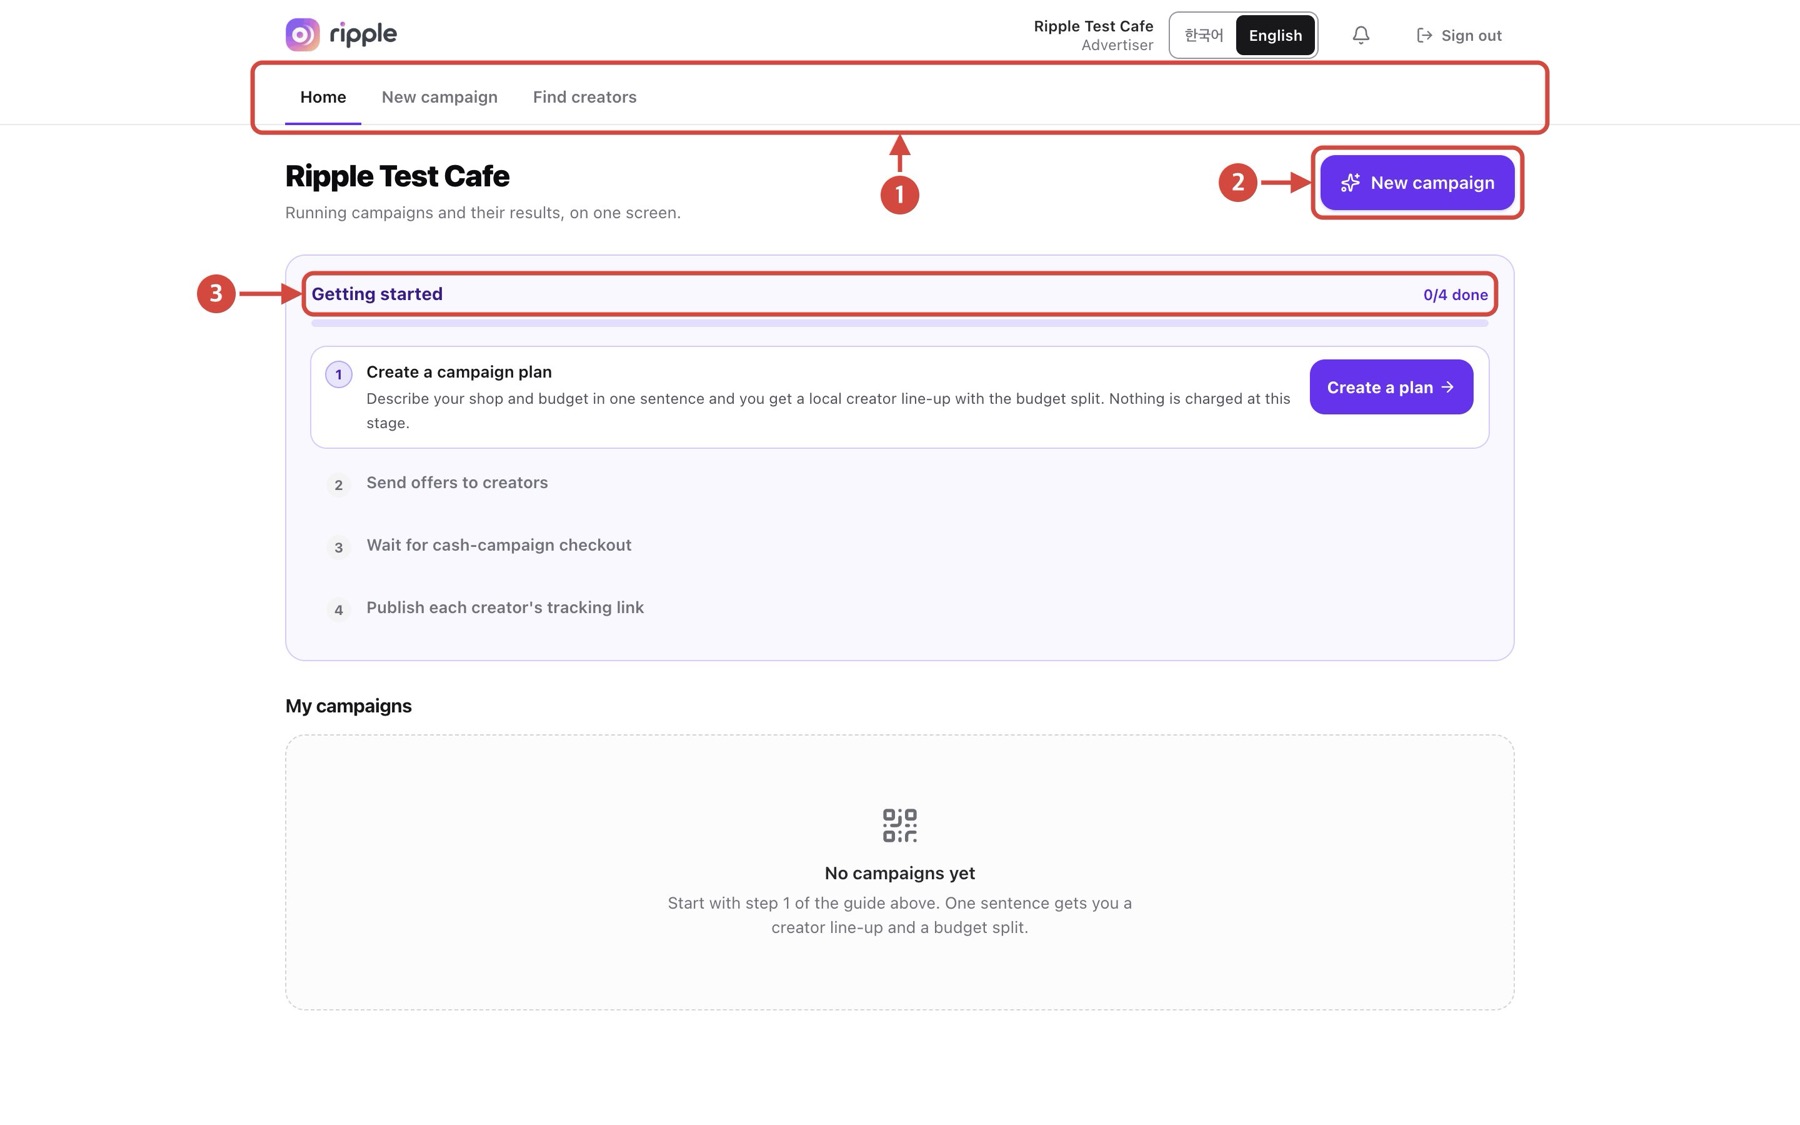
Tap the image to view it full size
- 1Use the main navigation at the top.
- 2Select “New campaign” to start a campaign.
- 3Follow “Getting started” for the order of steps.
Next Follow the getting-started buttons to go from creating a plan to posting the tracking link, in order.
Back to topWrite a campaign brief
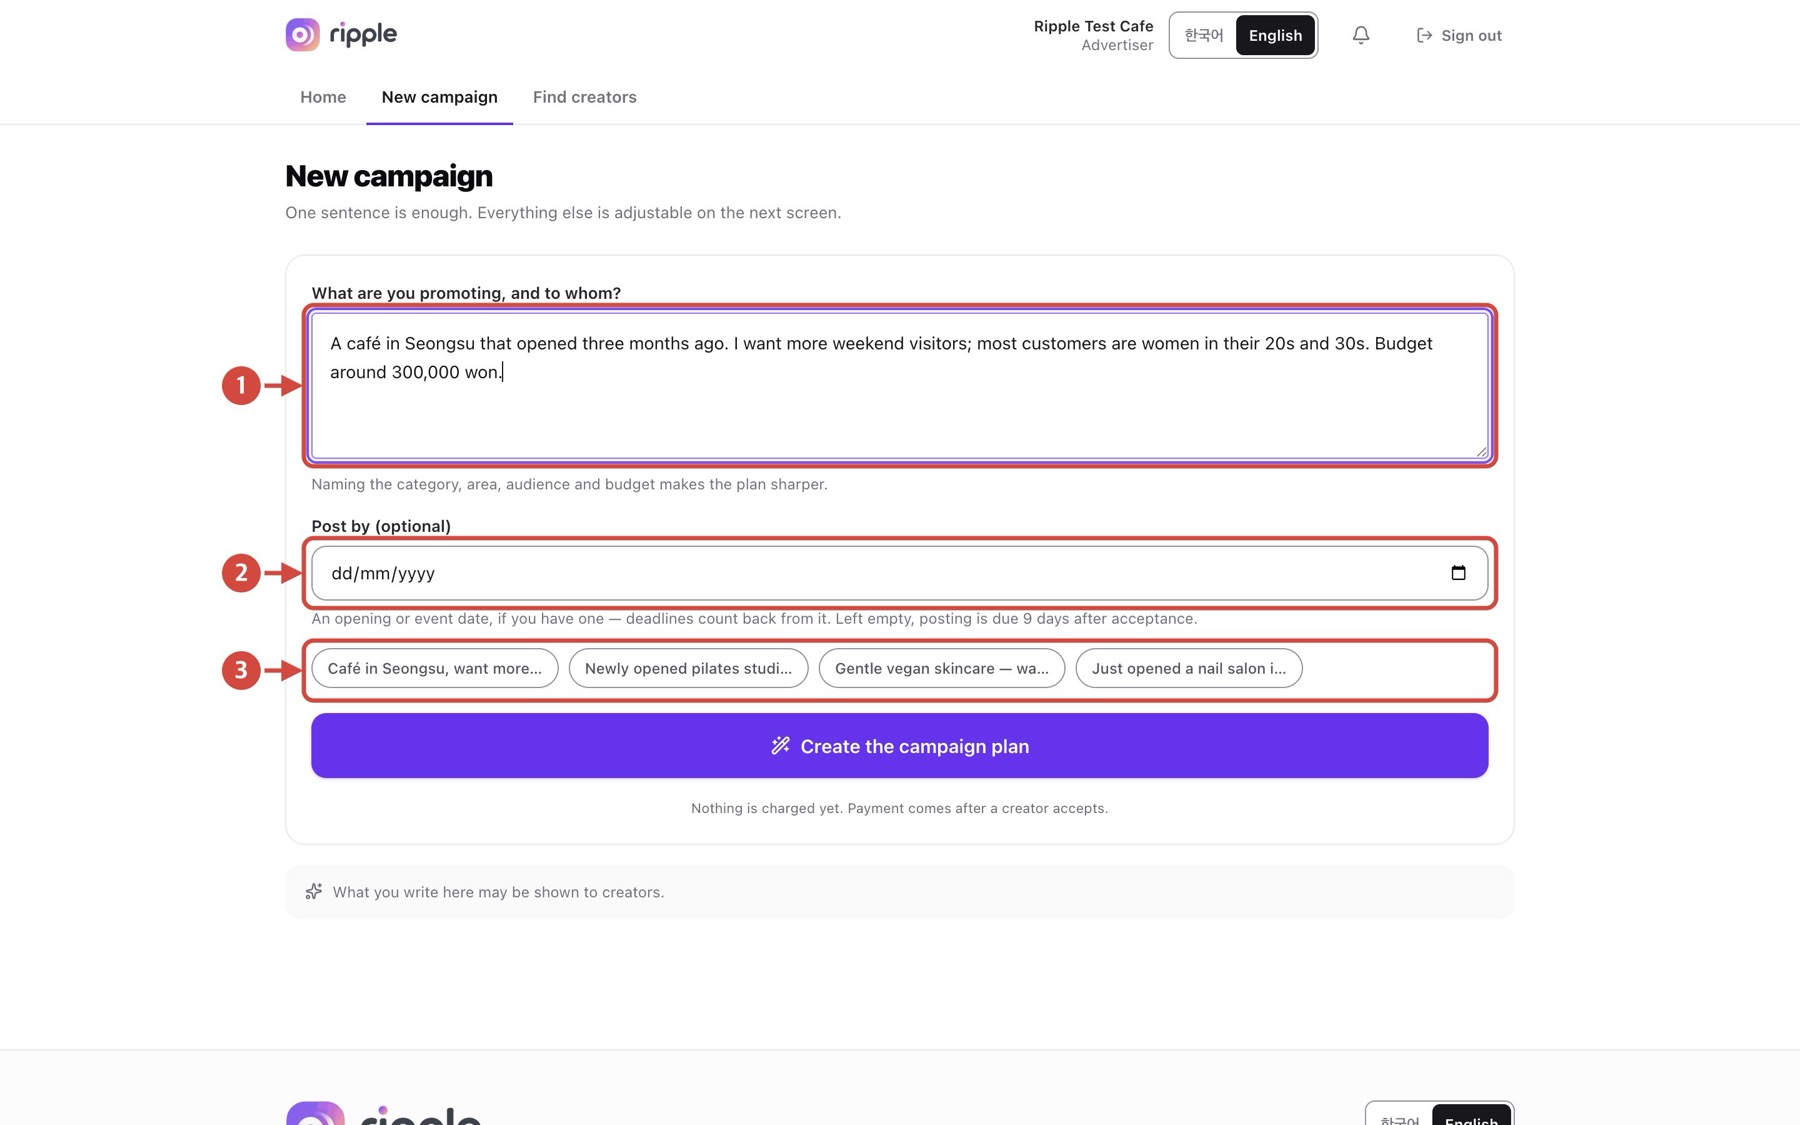
Tap the image to view it full size
- 1Describe your shop, target customers, budget and the content you want.
- 2Optionally set a “Post by” date.
- 3Or start from one of the examples.
Next When the brief is ready, select “Create the campaign plan”.
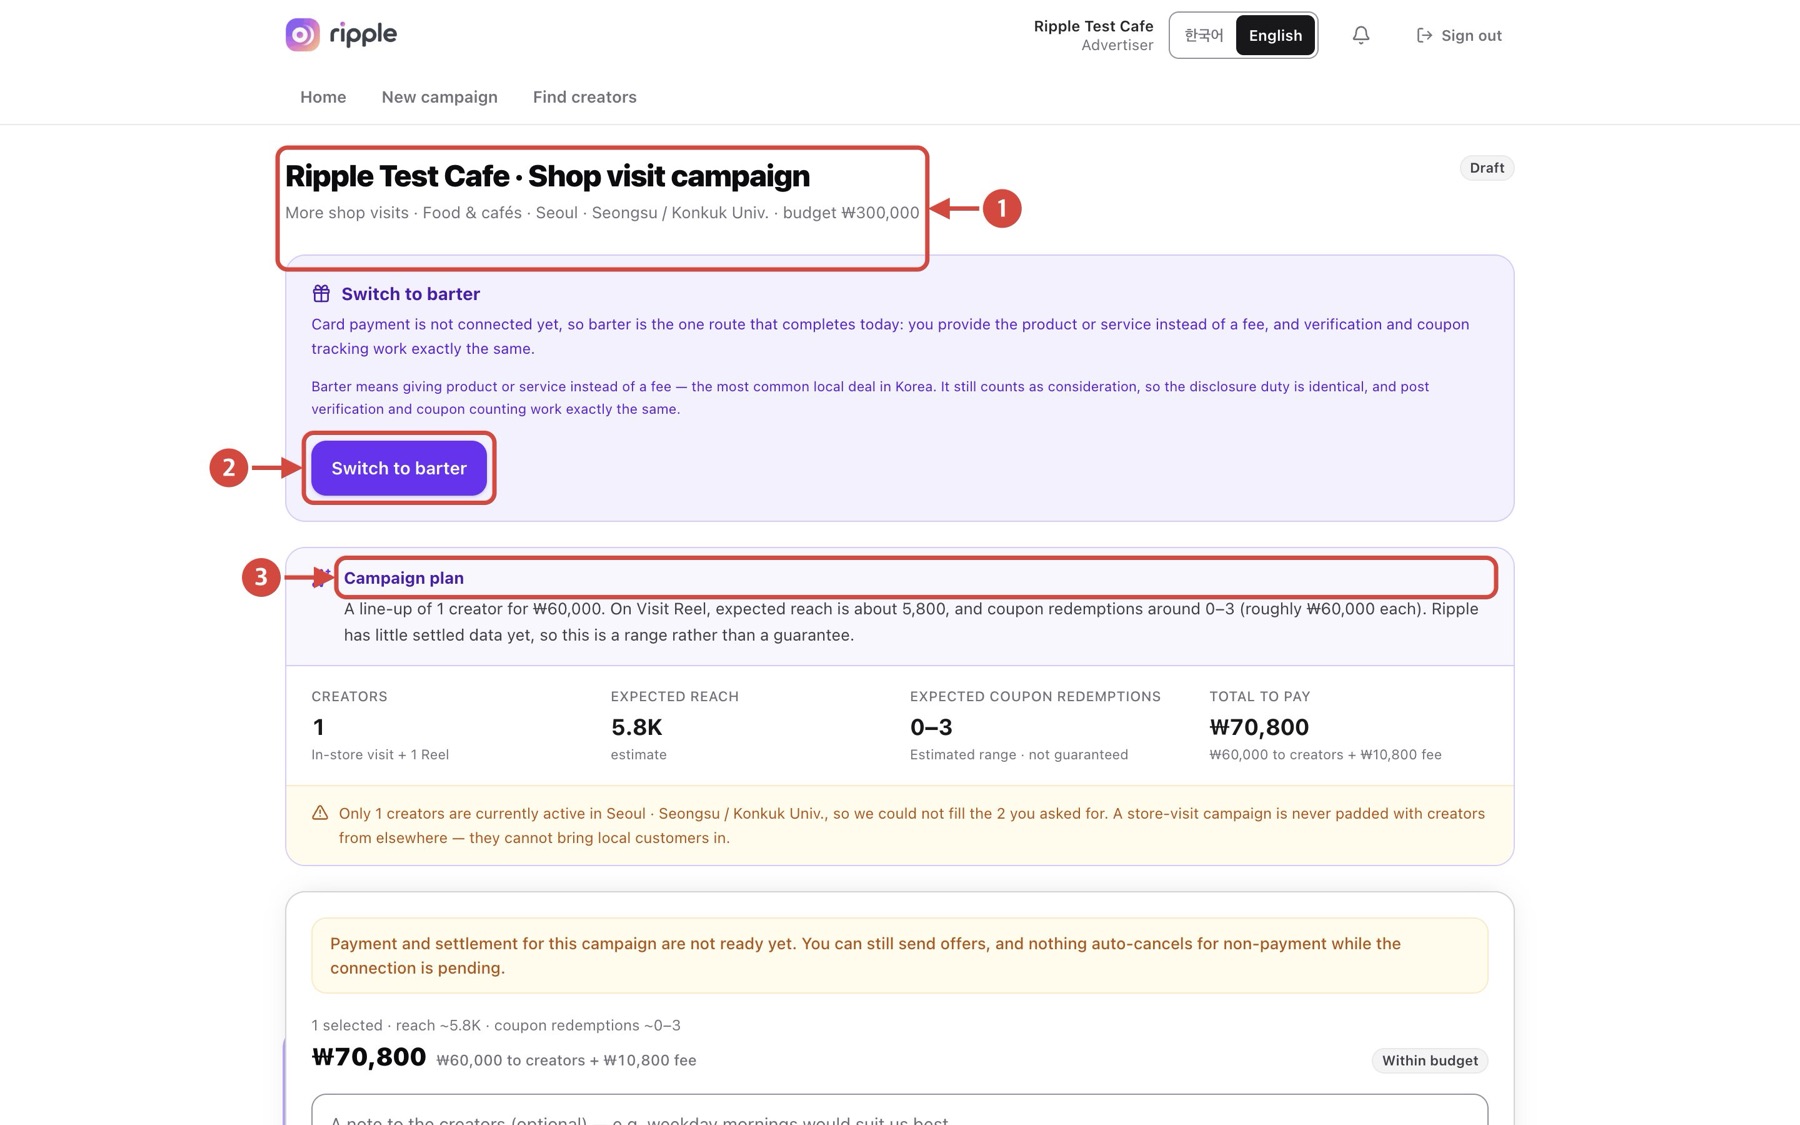
Back to topReview the suggested plan
Tap the image to view it full size
- 1Review the plan title and the conditions it picked up.
- 2To run it as a barter campaign, select “Switch to barter”.
- 3Review the suggested line-up and estimates under “Campaign plan”. Estimates are ranges, not guarantees.
Next Choose whom to invite, review the note further down the page and select “Send offers”.
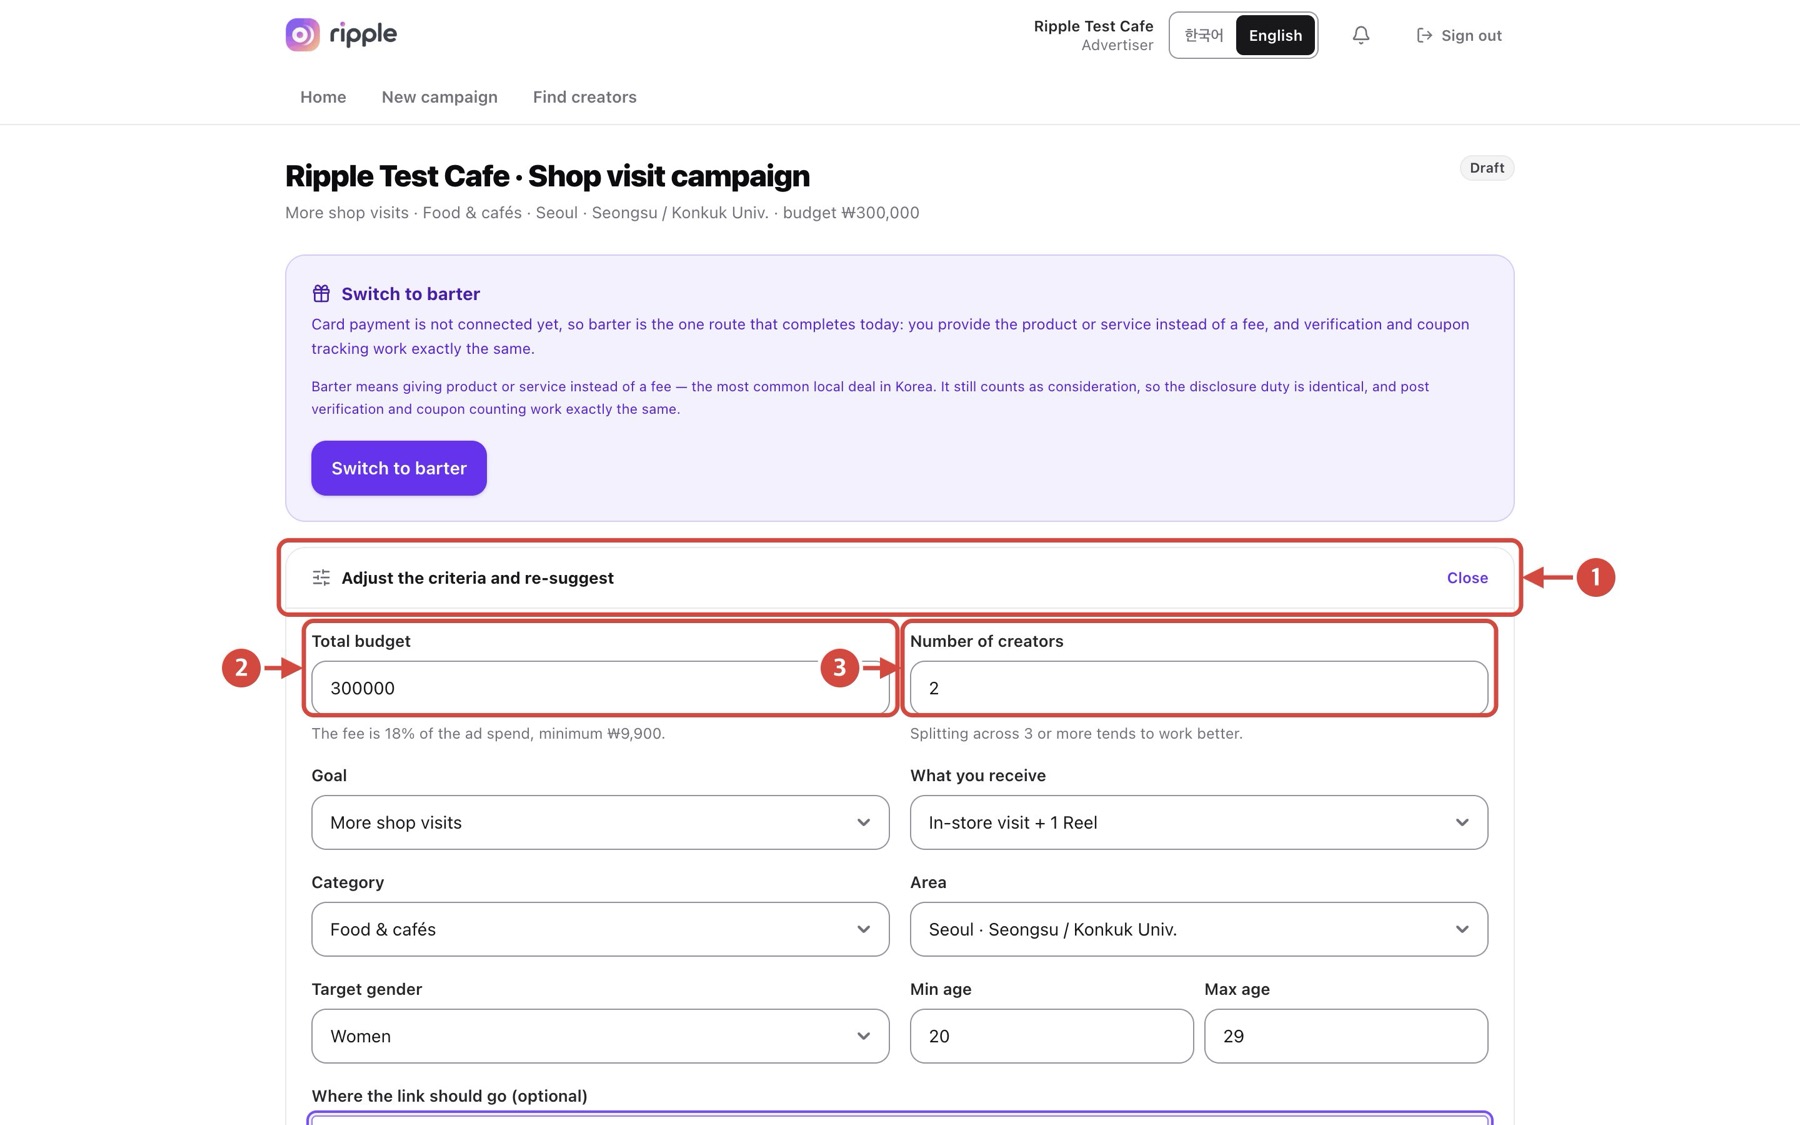
Back to topAdjust your conditions
Tap the image to view it full size
- 1Open “Adjust the criteria and re-suggest”.
- 2Change the total budget.
- 3Change the number of creators.
Next Complete the goal, content, area, destination link and requests, then select “Suggest again”. The link you enter under “Where the link should go” becomes the destination of the tracking links.
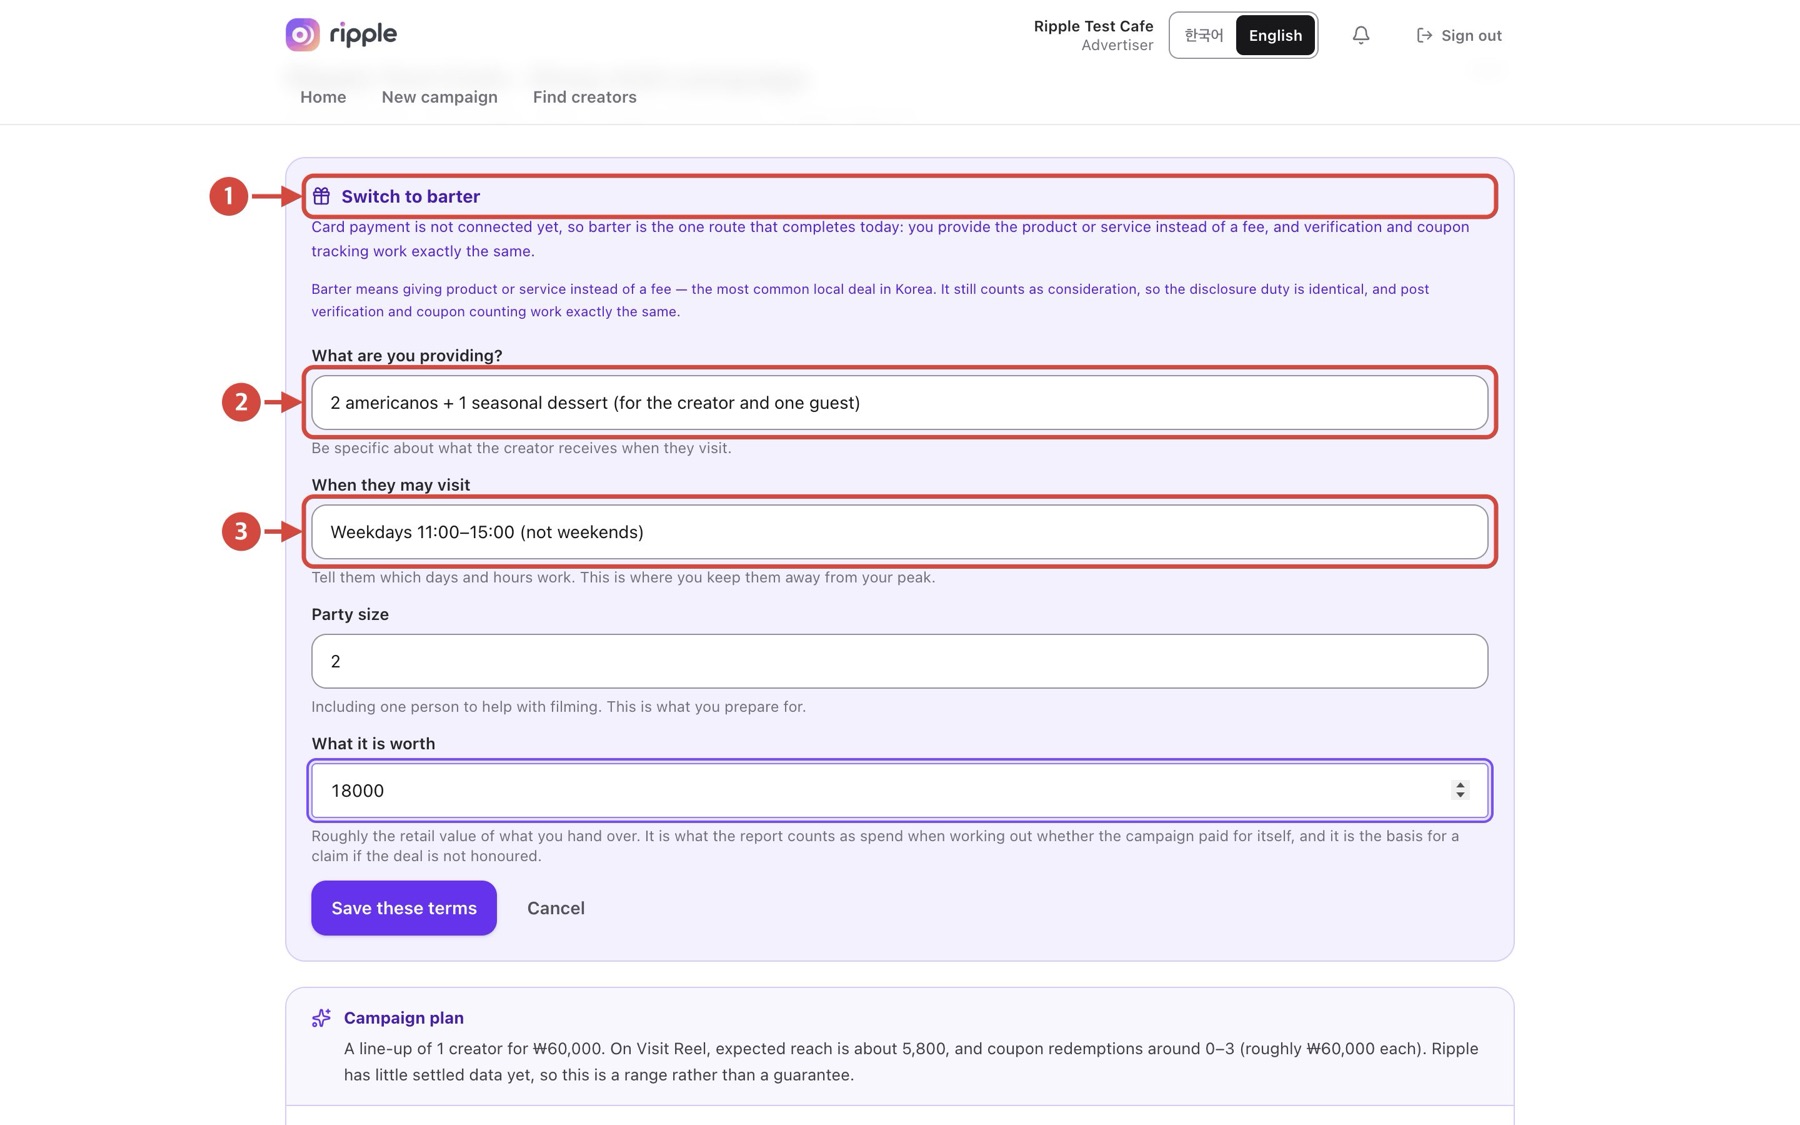
Back to topSet barter terms
Tap the image to view it full size
- 1Open the barter terms with “Switch to barter”.
- 2Enter what you will provide.
- 3Enter when the creator may visit.
Next Check the party size and what it is worth, then select “Save these terms”.
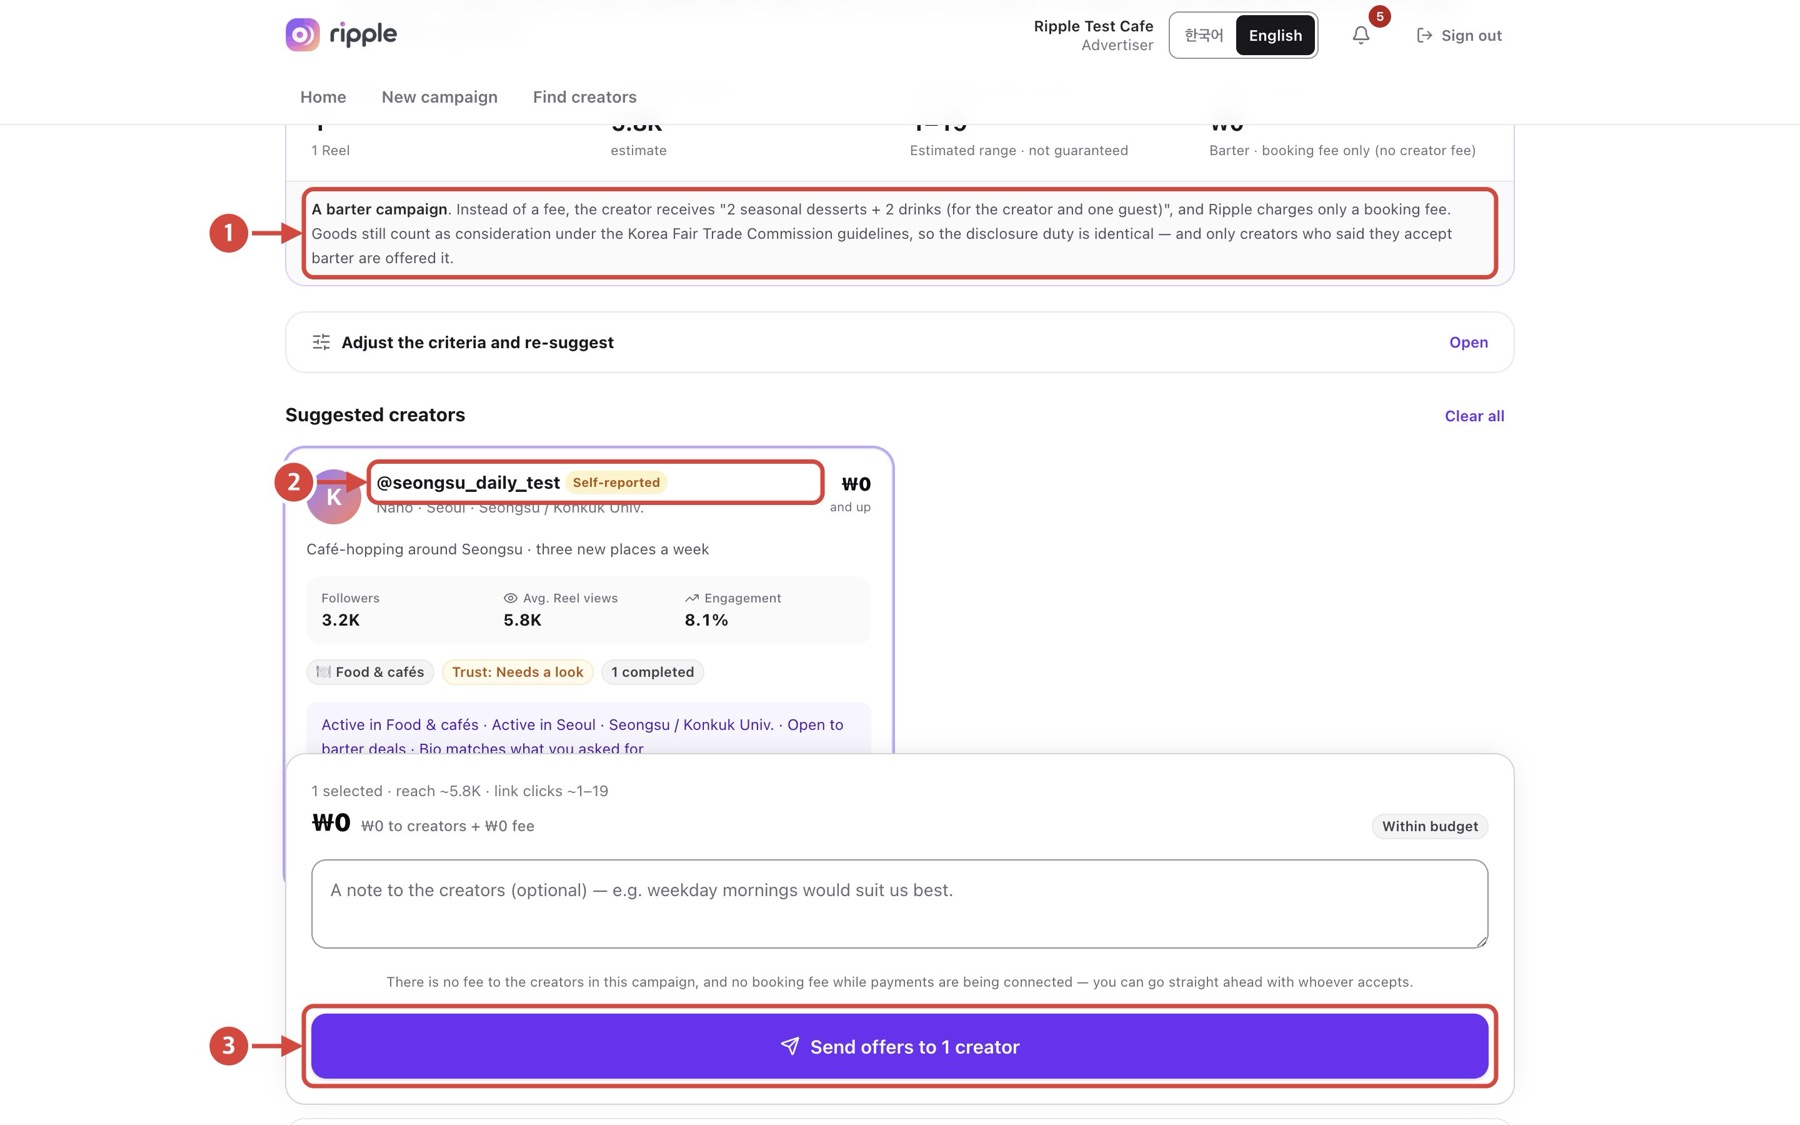
Back to topSend a creator offer
Tap the image to view it full size
- 1Check that the plan says “A barter campaign”.
- 2Open a suggested creator’s profile.
- 3Add an optional note, then select “Send offers”.
Next Offers go only to the creators marked as included in the offers.
Back to topTrack offer status
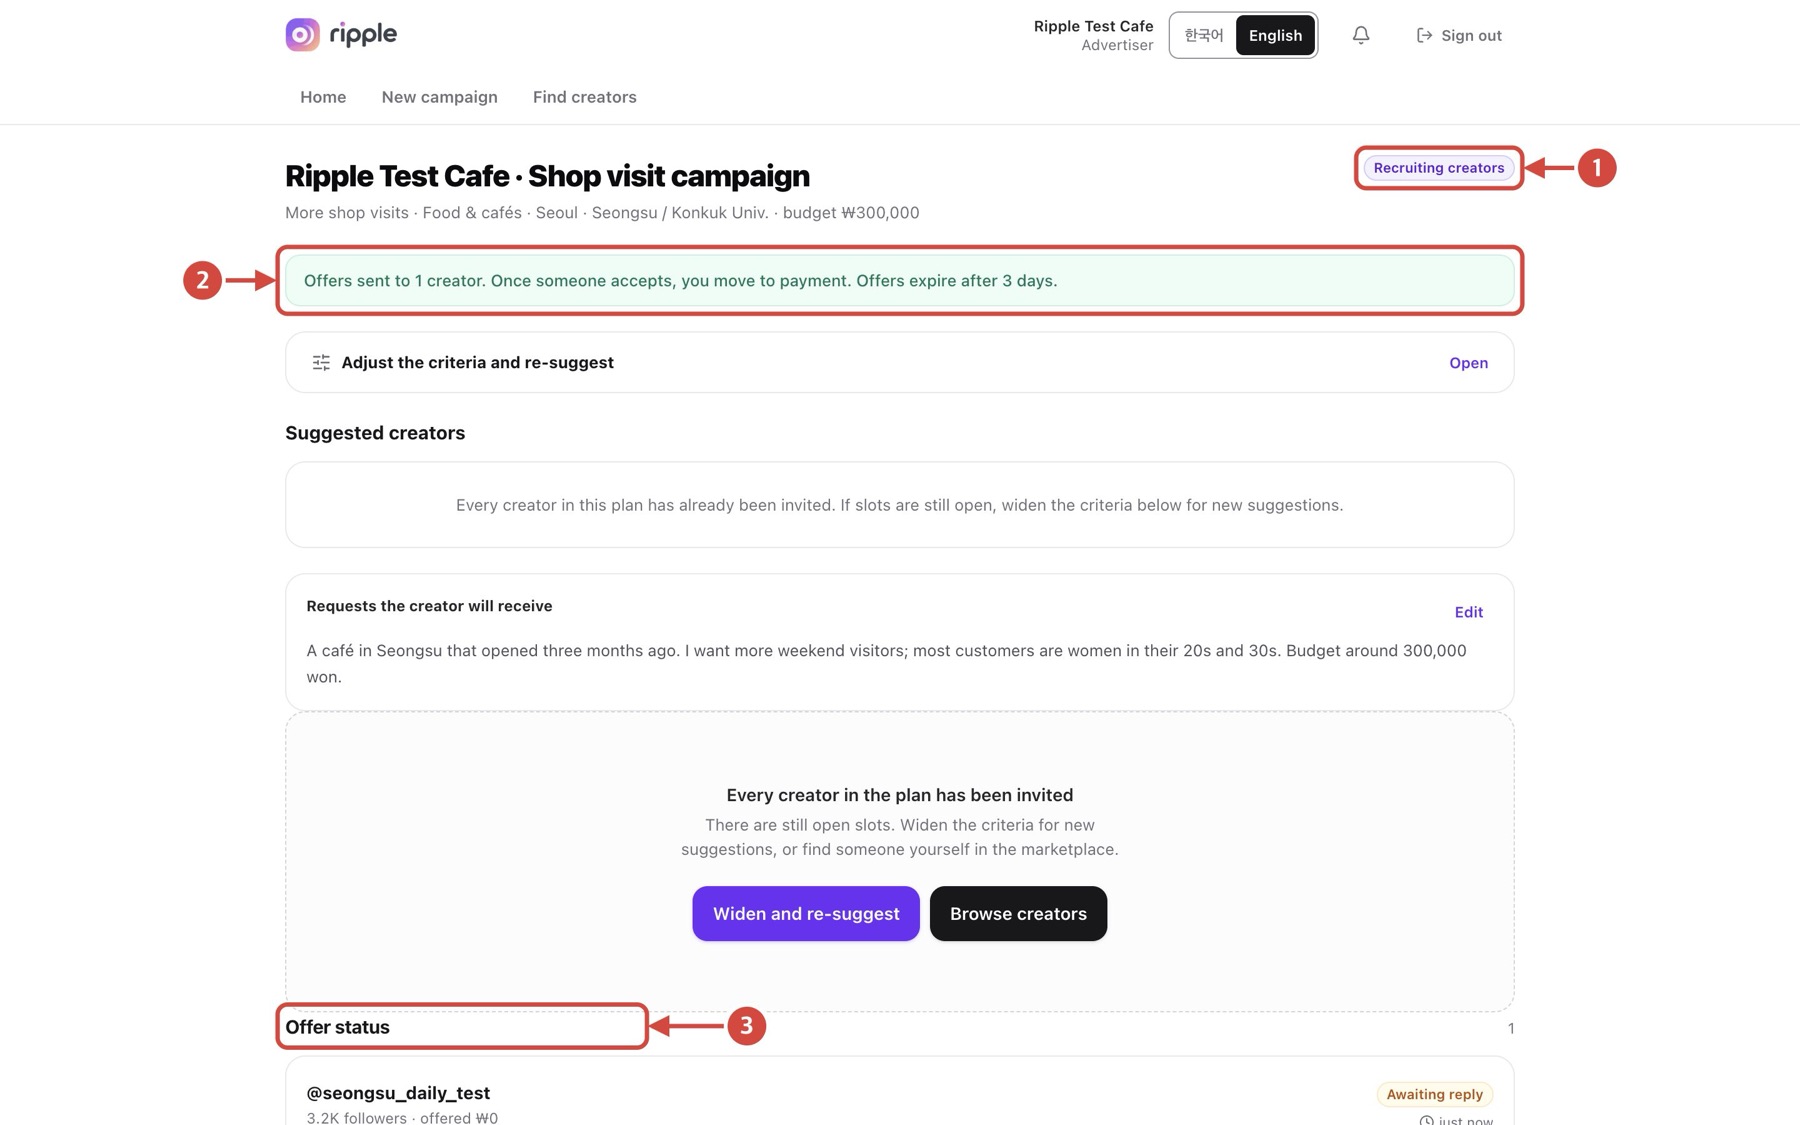
Tap the image to view it full size
- 1Check that the campaign shows “Recruiting creators”.
- 2Read the notice about the offers you sent.
- 3Follow replies under “Offer status”.
Next If replies are slow, widen the criteria and get new suggestions.
Back to topBrowse creators directly
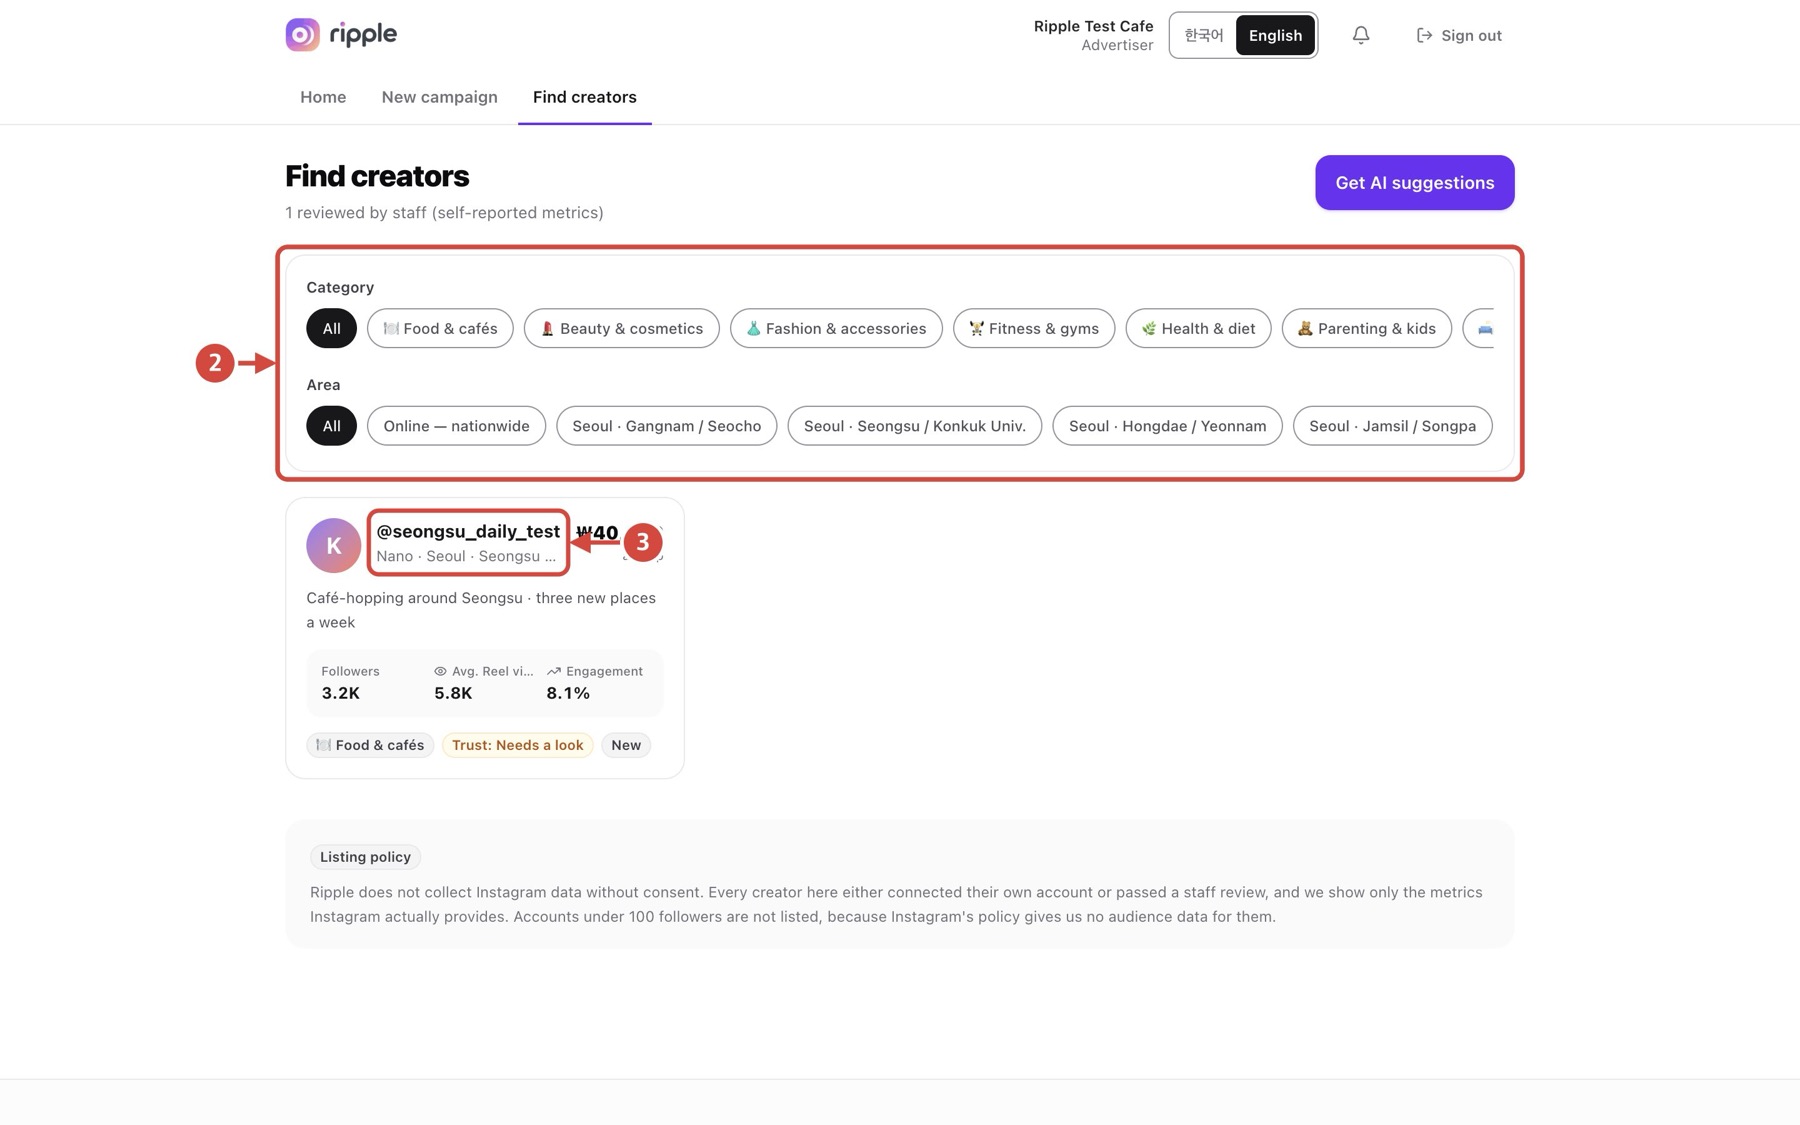
Tap the image to view it full size
- 1Filter by category.
- 2Filter by area.
- 3Open a creator profile.
Next Compare followers, average views and prices before sending an offer.
Back to topConfirm a booking
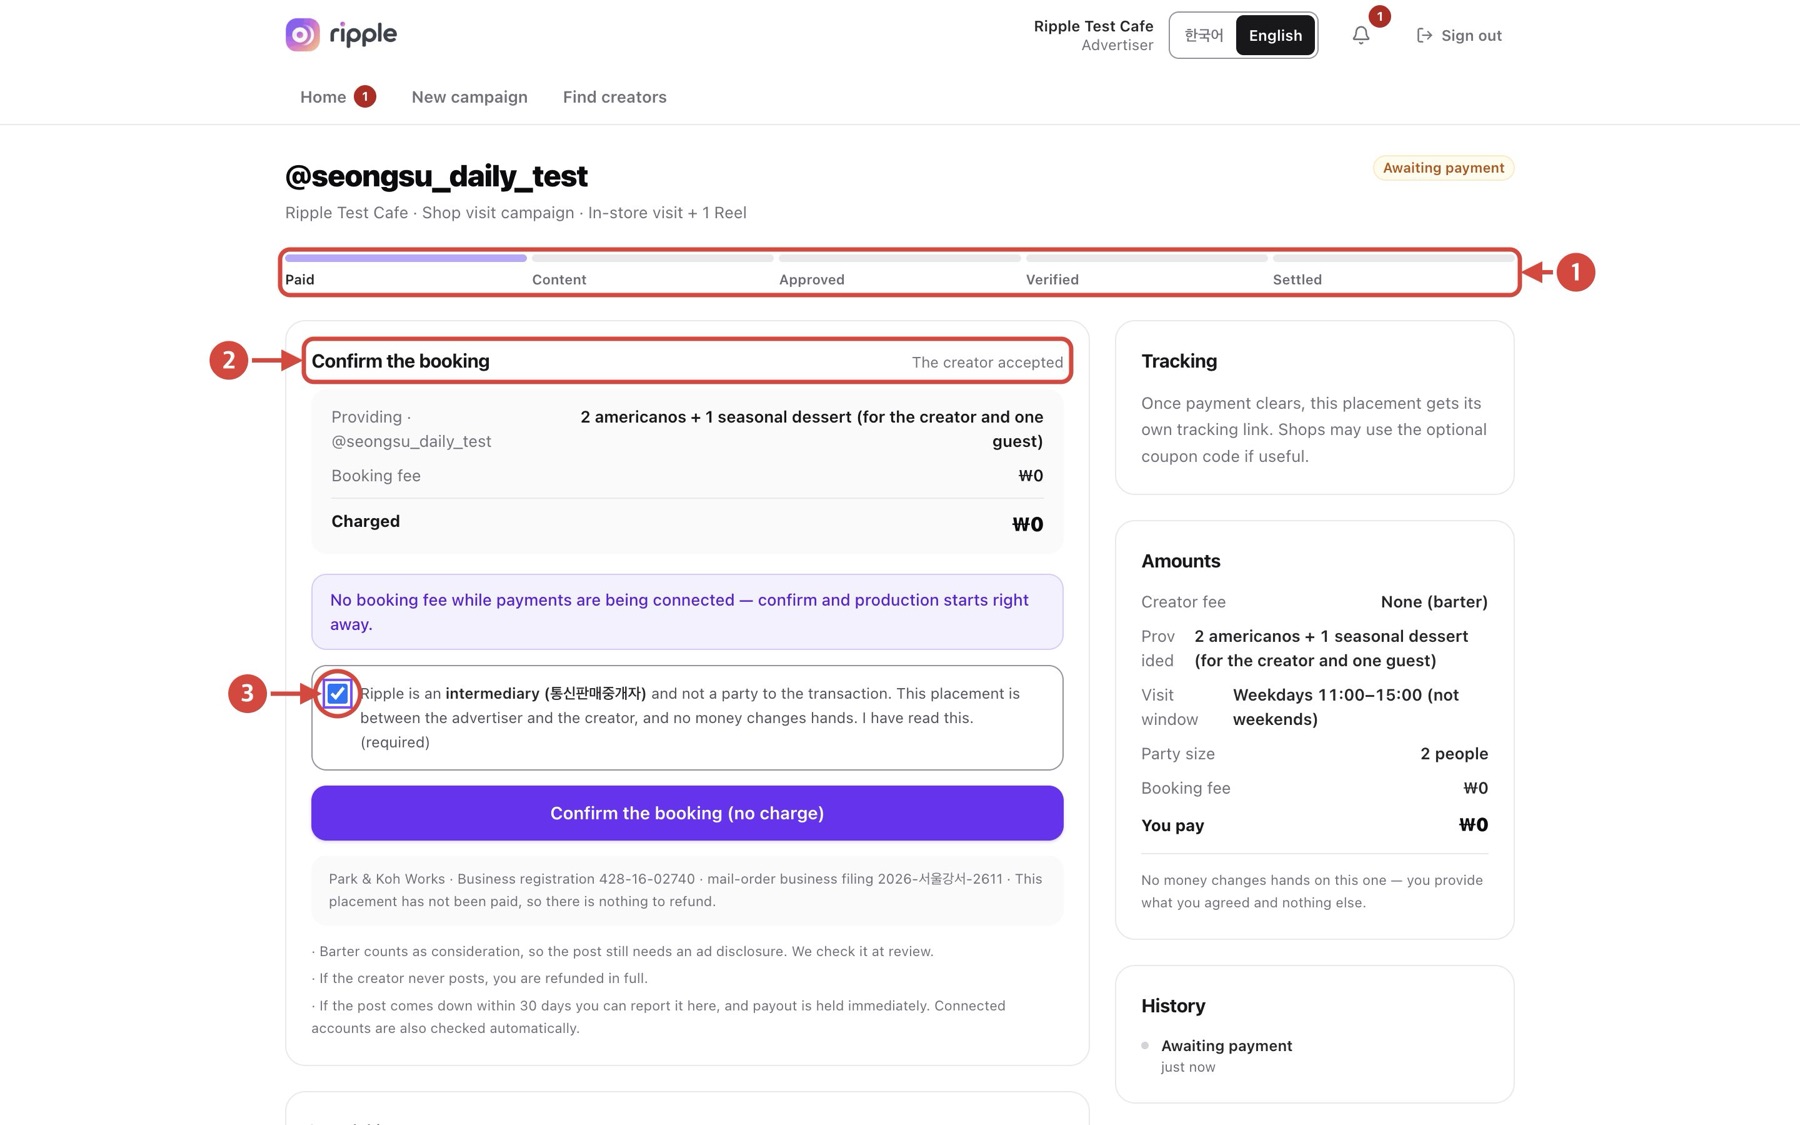
Tap the image to view it full size
- 1Review the contract progress steps.
- 2Under “Confirm the booking”, check what you provide and the amount charged.
- 3Tick the required confirmation box.
Next Agree on the visit time in messages, then select “Confirm the booking”. The creator starts production once you confirm.
Back to topShare the tracking link
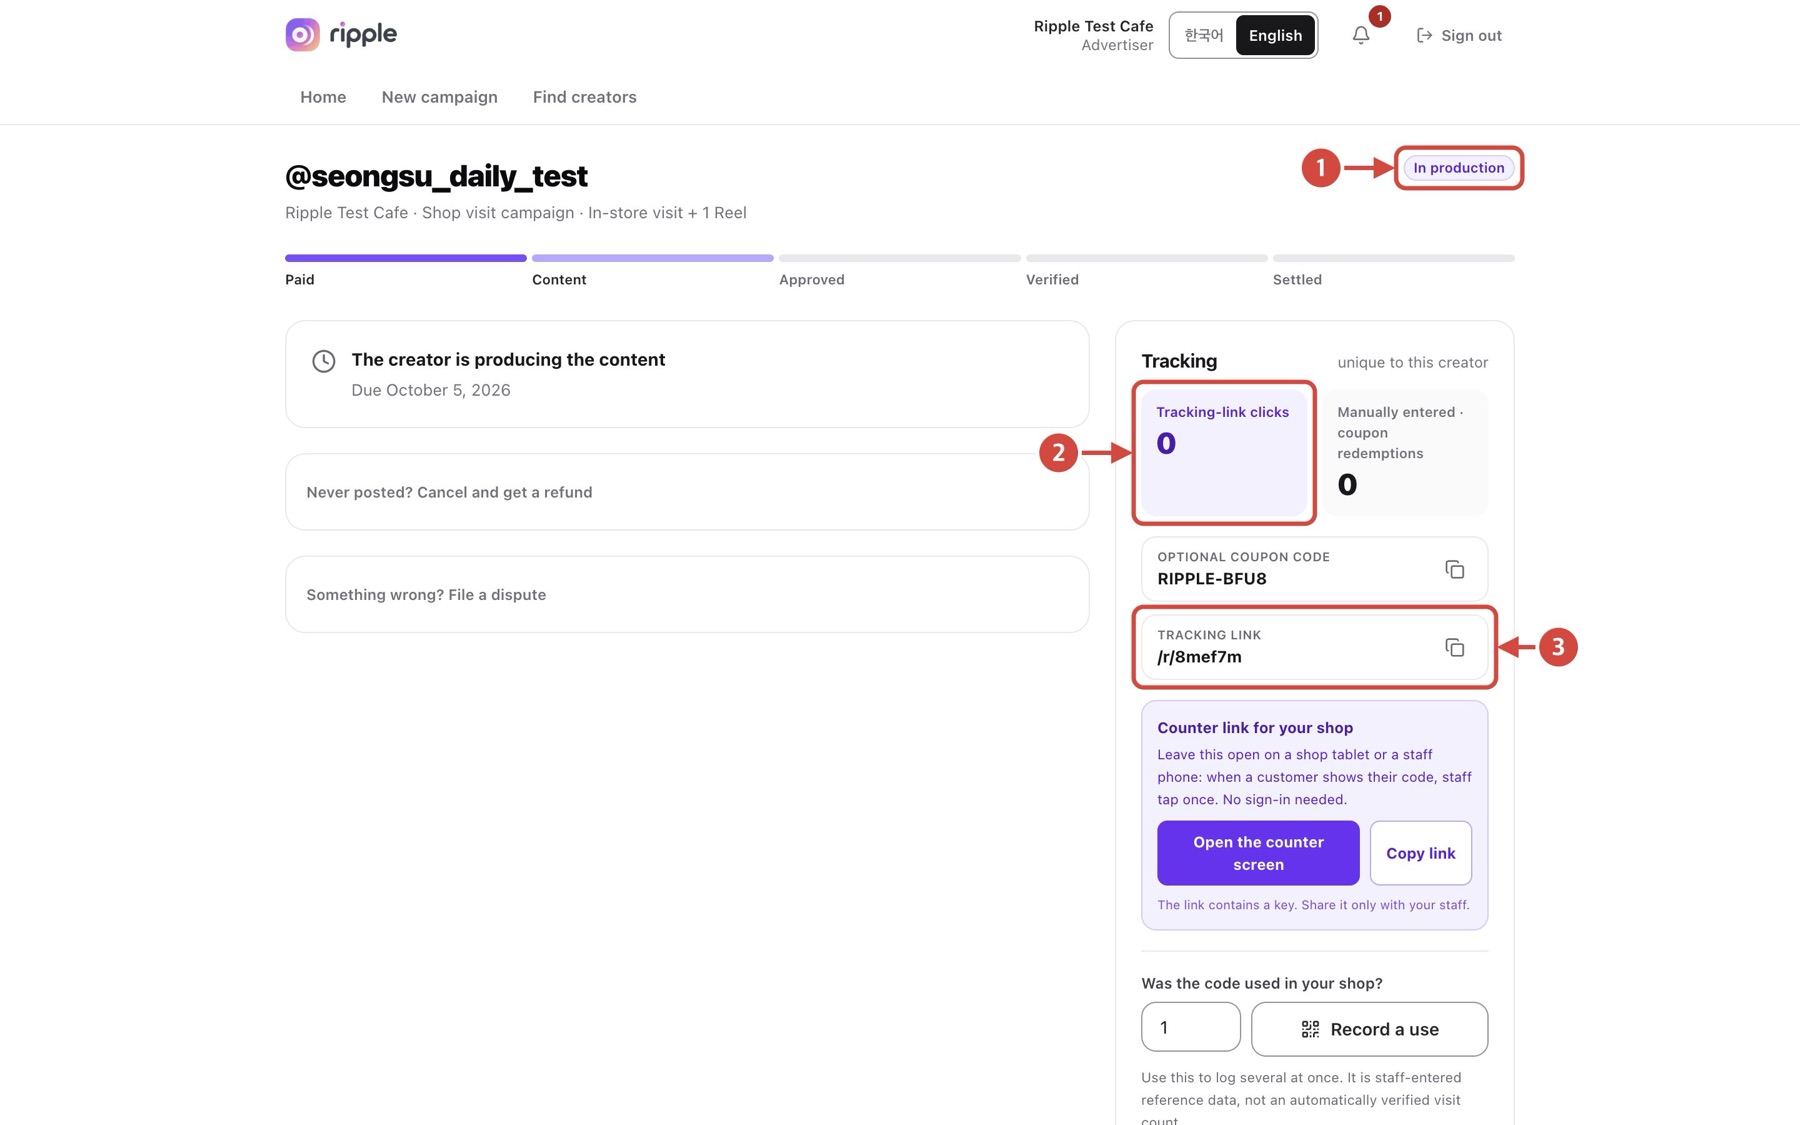
Tap the image to view it full size
- 1Confirm the contract is “In production”.
- 2“Tracking-link clicks” counts clicks on this creator’s own link.
- 3Copy the tracking link and send it to the creator.
Next If no tracking link appears, add a destination under the campaign’s “Adjust the criteria and re-suggest”. Clicks count as interest only, not visits or purchases, and the coupon code is optional reference data.
Back to top(Optional) Record coupon use at the till
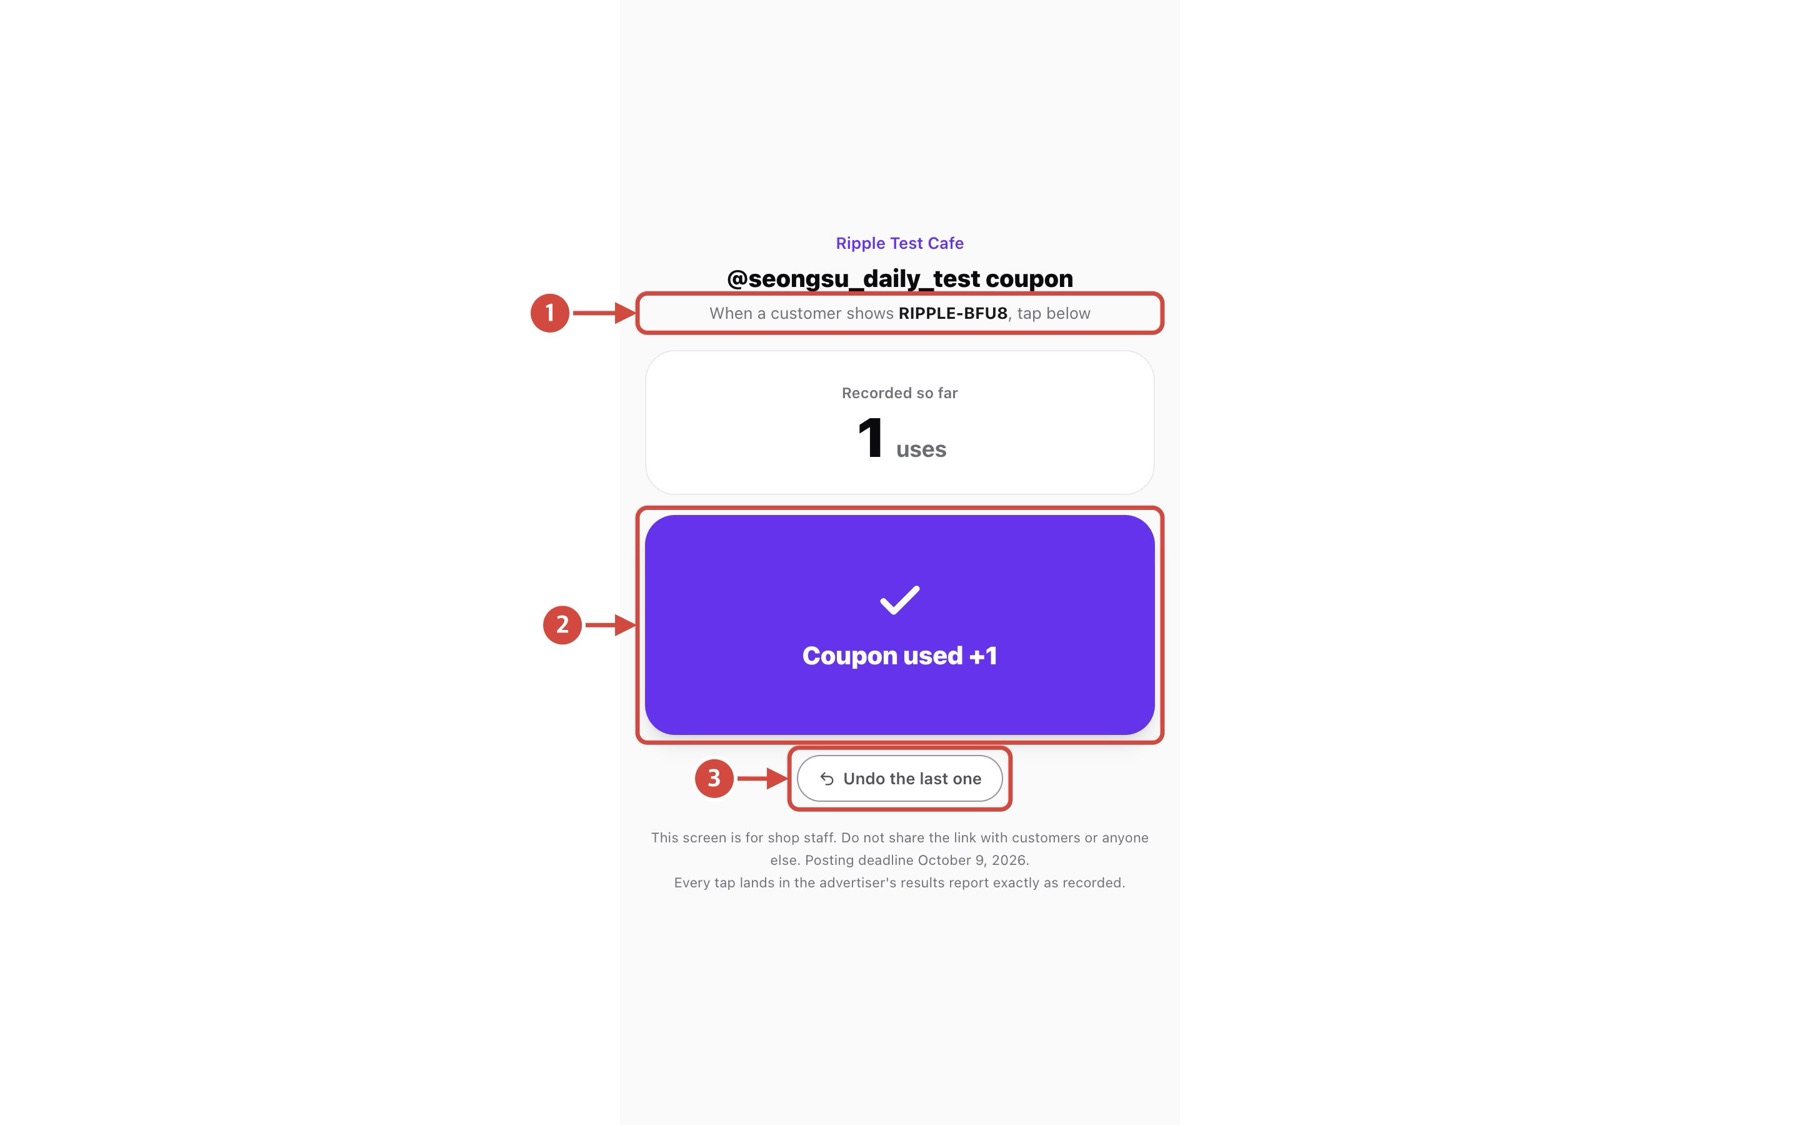
Tap the image to view it full size
- 1Check that the code the customer shows matches the one on screen.
- 2Select “Coupon used +1” when it is used.
- 3If you tapped by mistake, select “Undo the last one”.
Next Coupon records are staff-entered reference data, not automatically verified visits. Shops that do not use coupons can skip this step.
Back to topReview submitted content
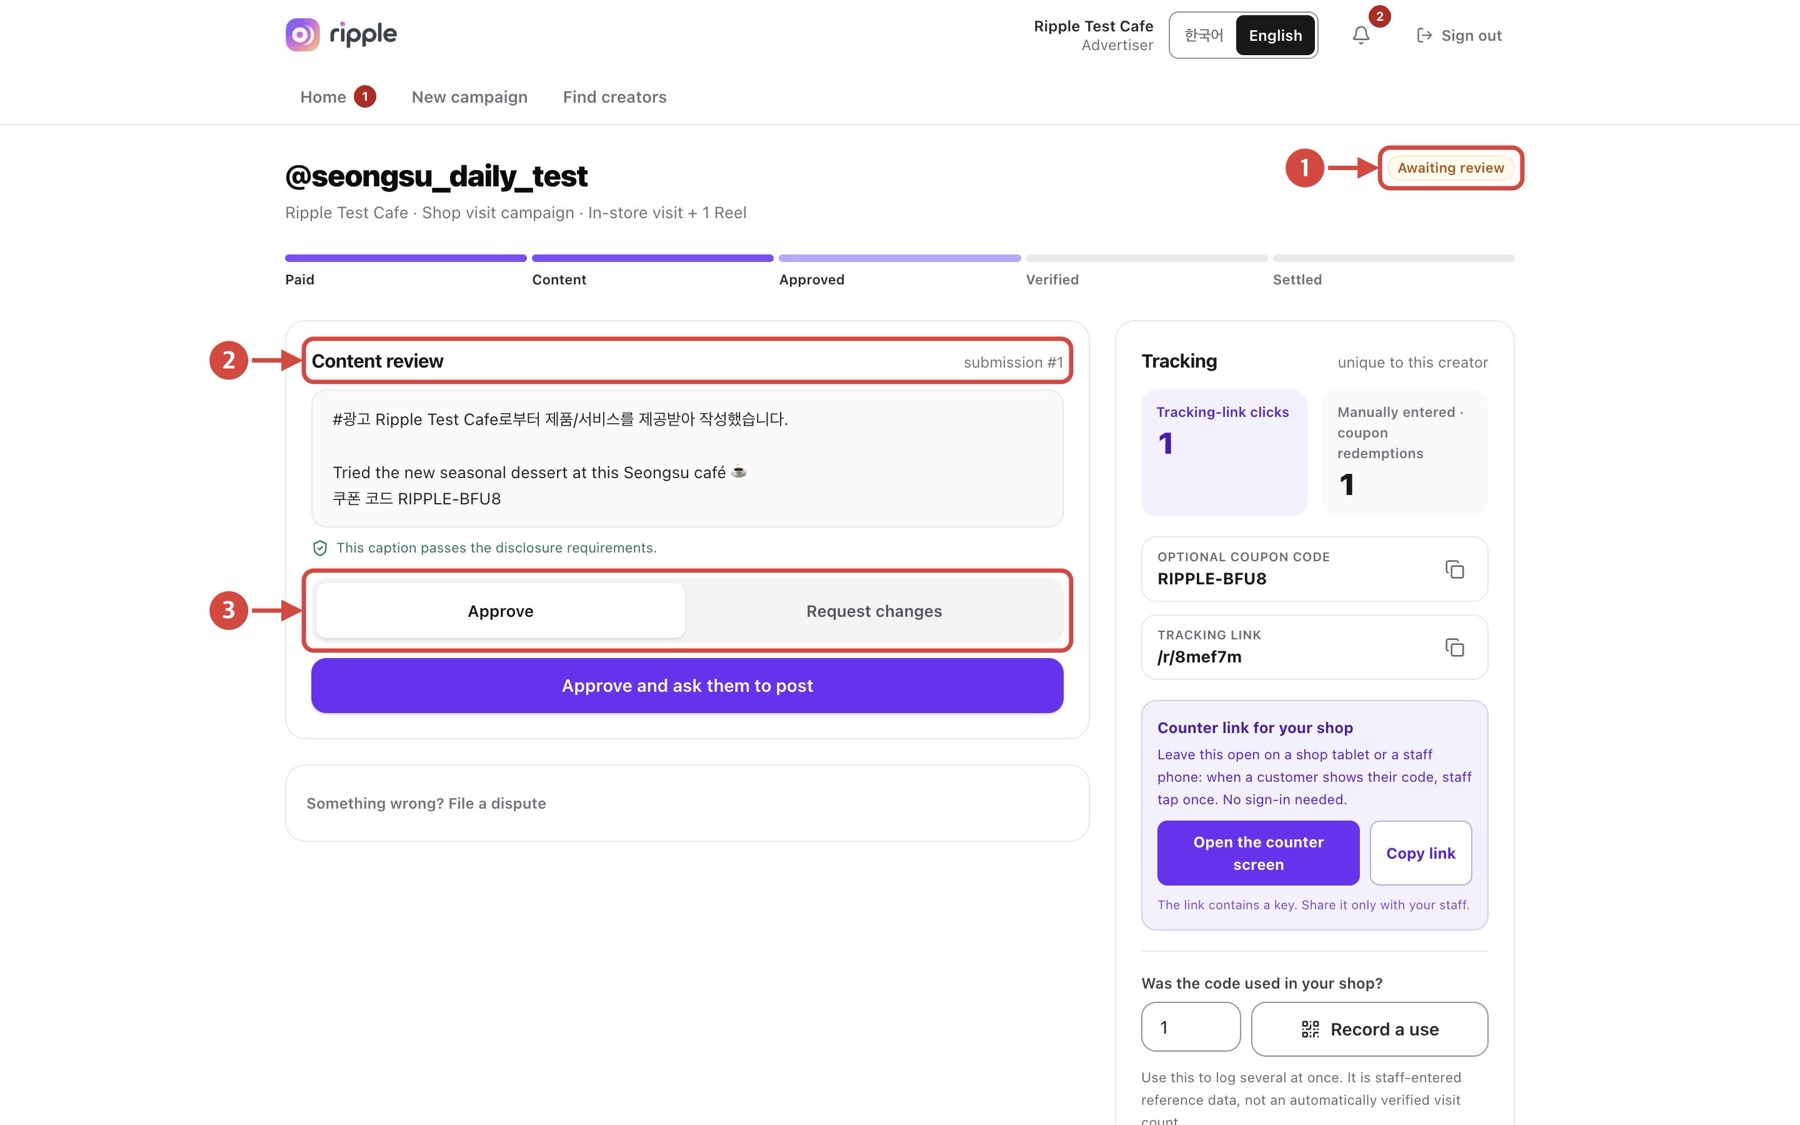
Tap the image to view it full size
- 1Confirm the contract is “Awaiting review”.
- 2Compare the submitted caption with your brief.
- 3Choose “Approve” or “Request changes”.
Next To approve, select “Approve and ask them to post”. For changes, choose “Request changes”, explain what to change and select “Send the change request”.
Back to topVerify the published post
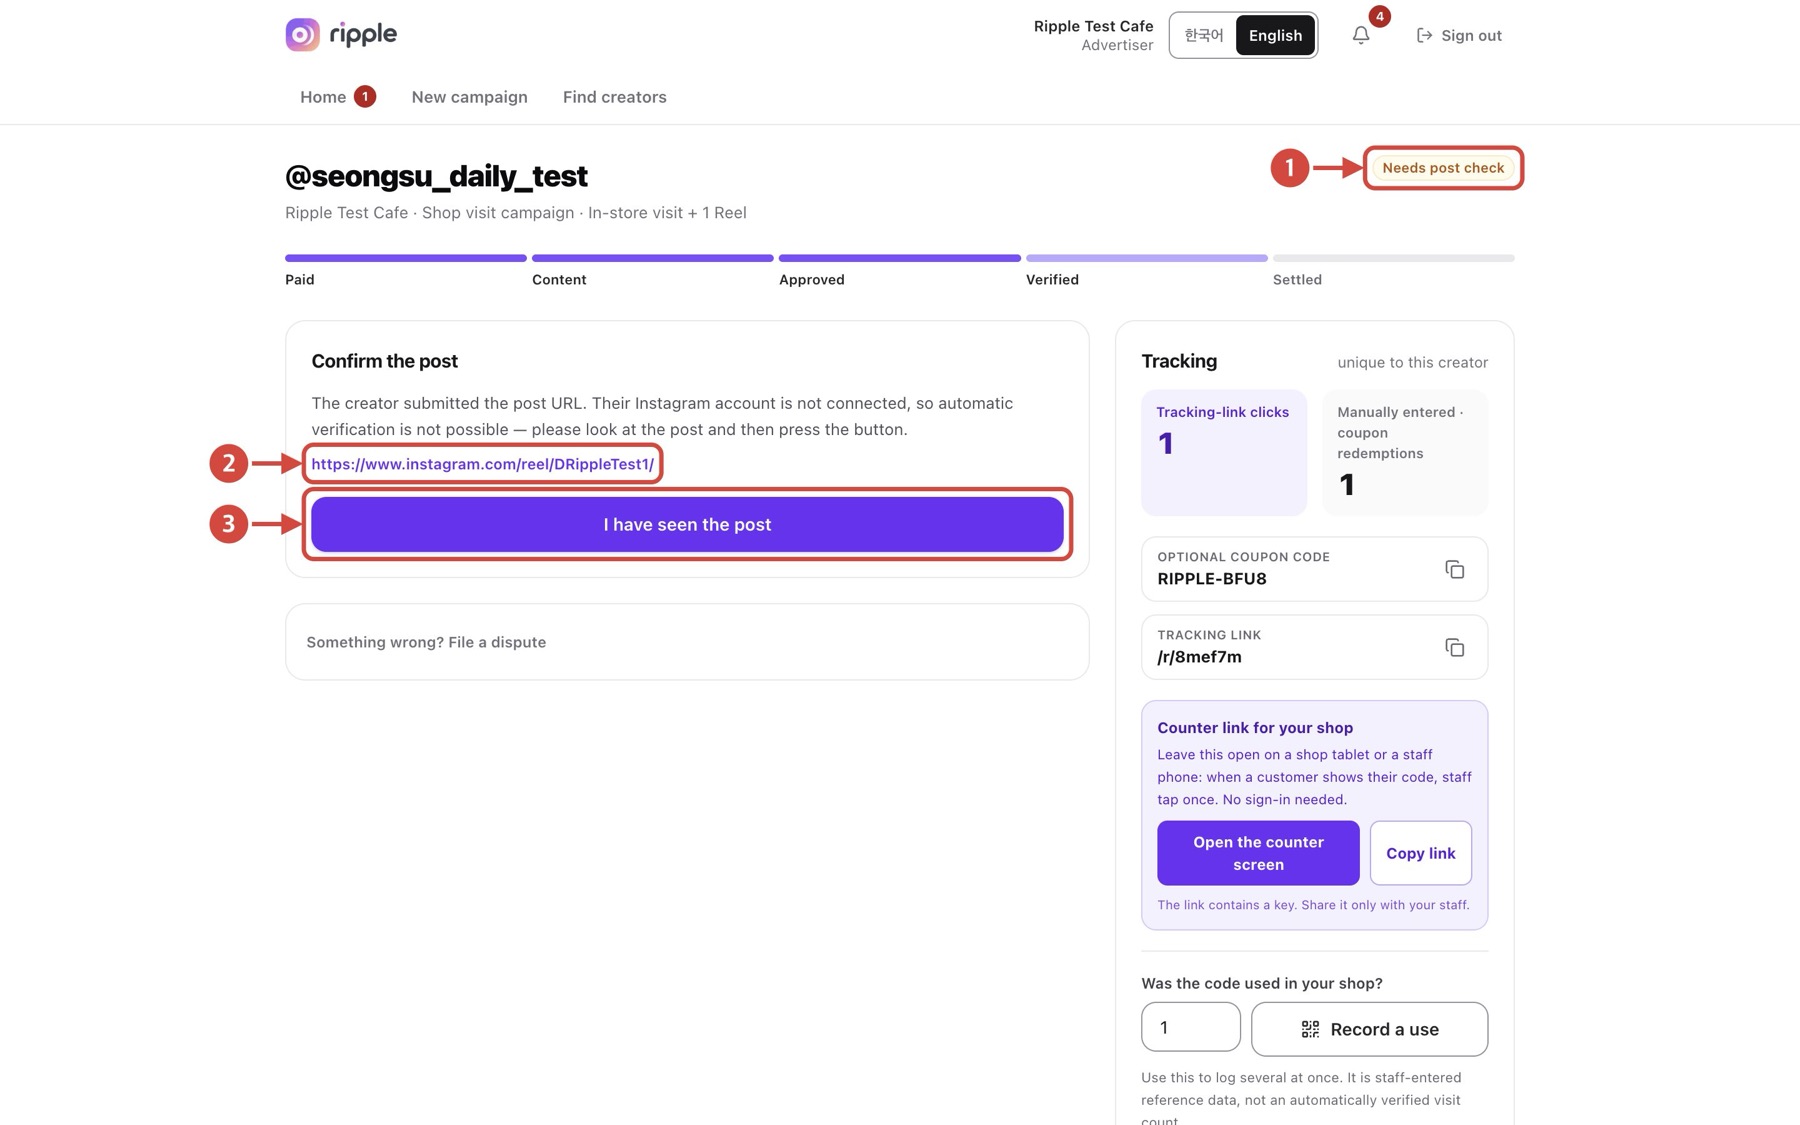
Tap the image to view it full size
- 1Confirm the contract shows “Needs post check”.
- 2Open the Instagram URL the creator submitted.
- 3Only after checking the live post and its ad label, select “I have seen the post”.
Next A submitted URL alone does not prove the post is live. Then select “Approve the payout” to close the placement; in a barter deal nothing is paid.
Back to topCompletion and feedback
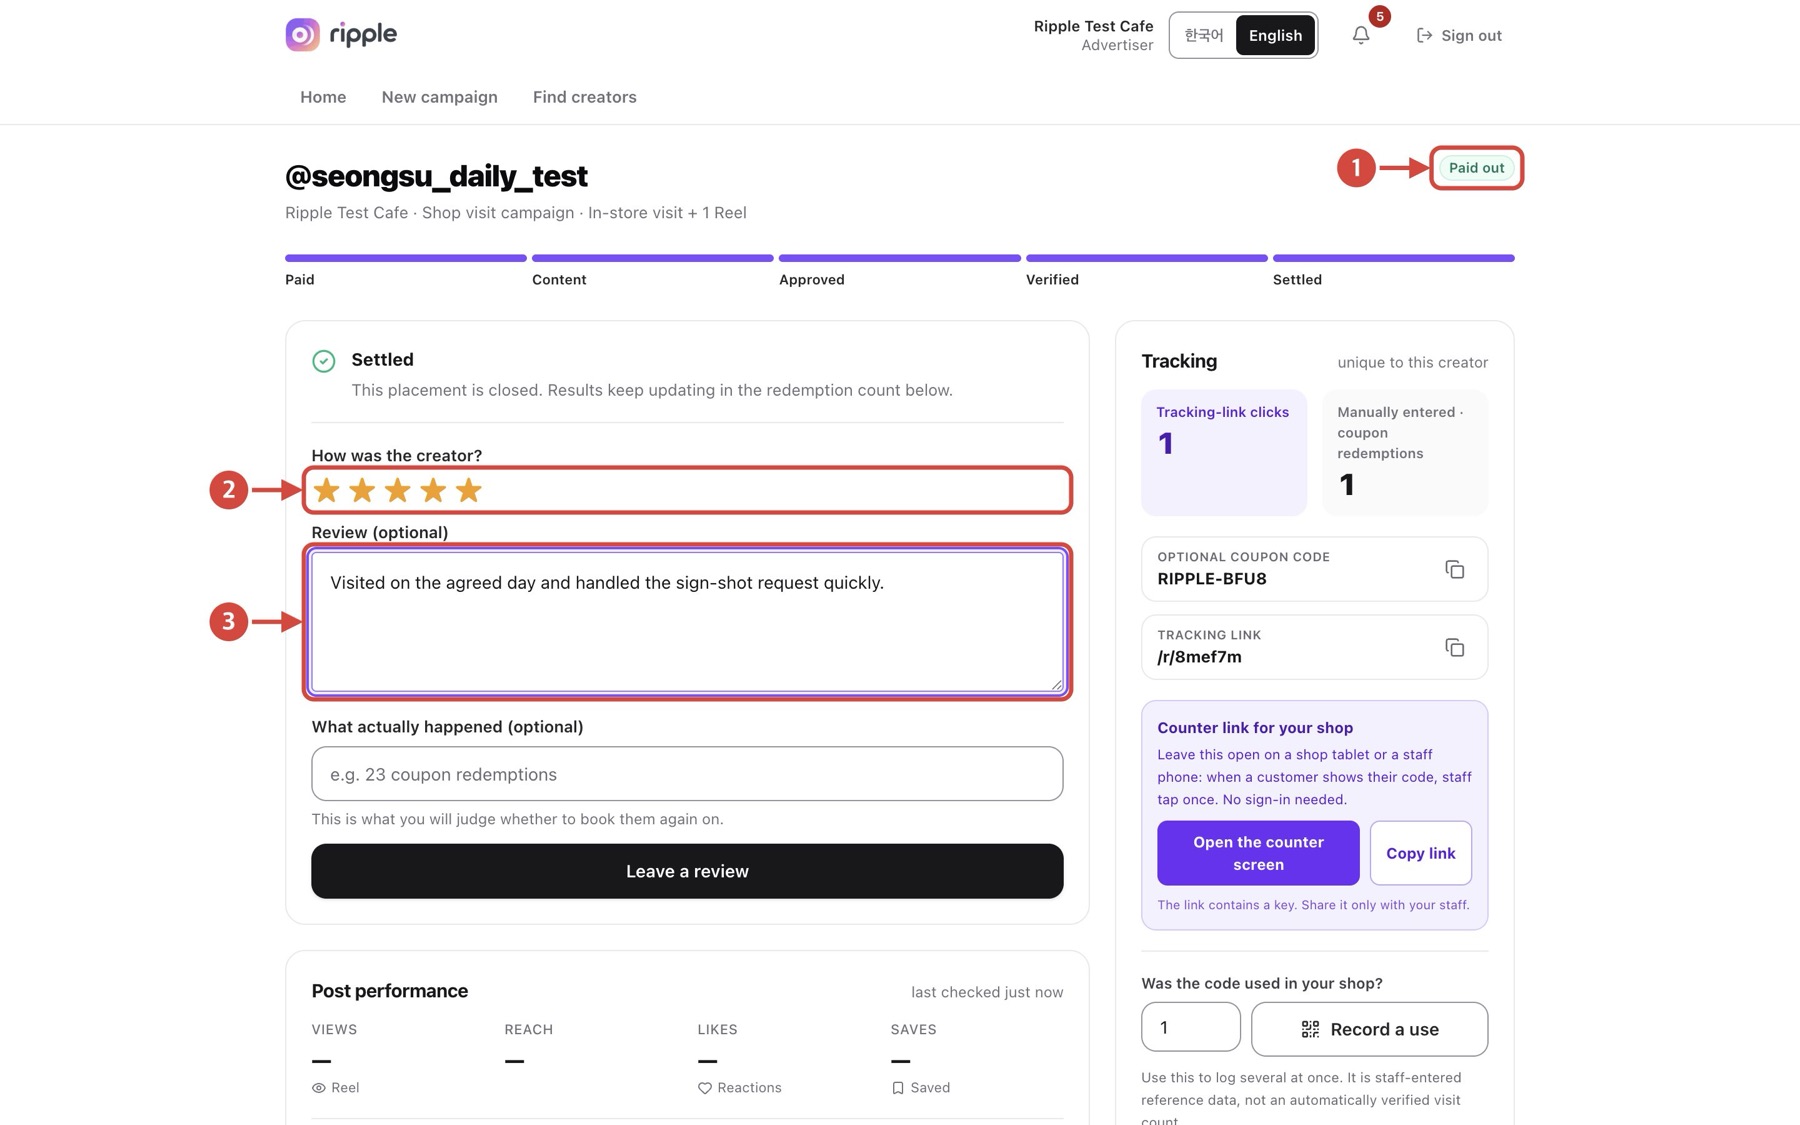
Tap the image to view it full size
- 1Confirm the contract is complete. The badge reads “Paid out”, but no money moves in a barter deal.
- 2Select a star rating.
- 3Write your review.
Next Select “Leave a review”. A completed status on these test screens is not proof of any payout.
Back to topRead the performance report
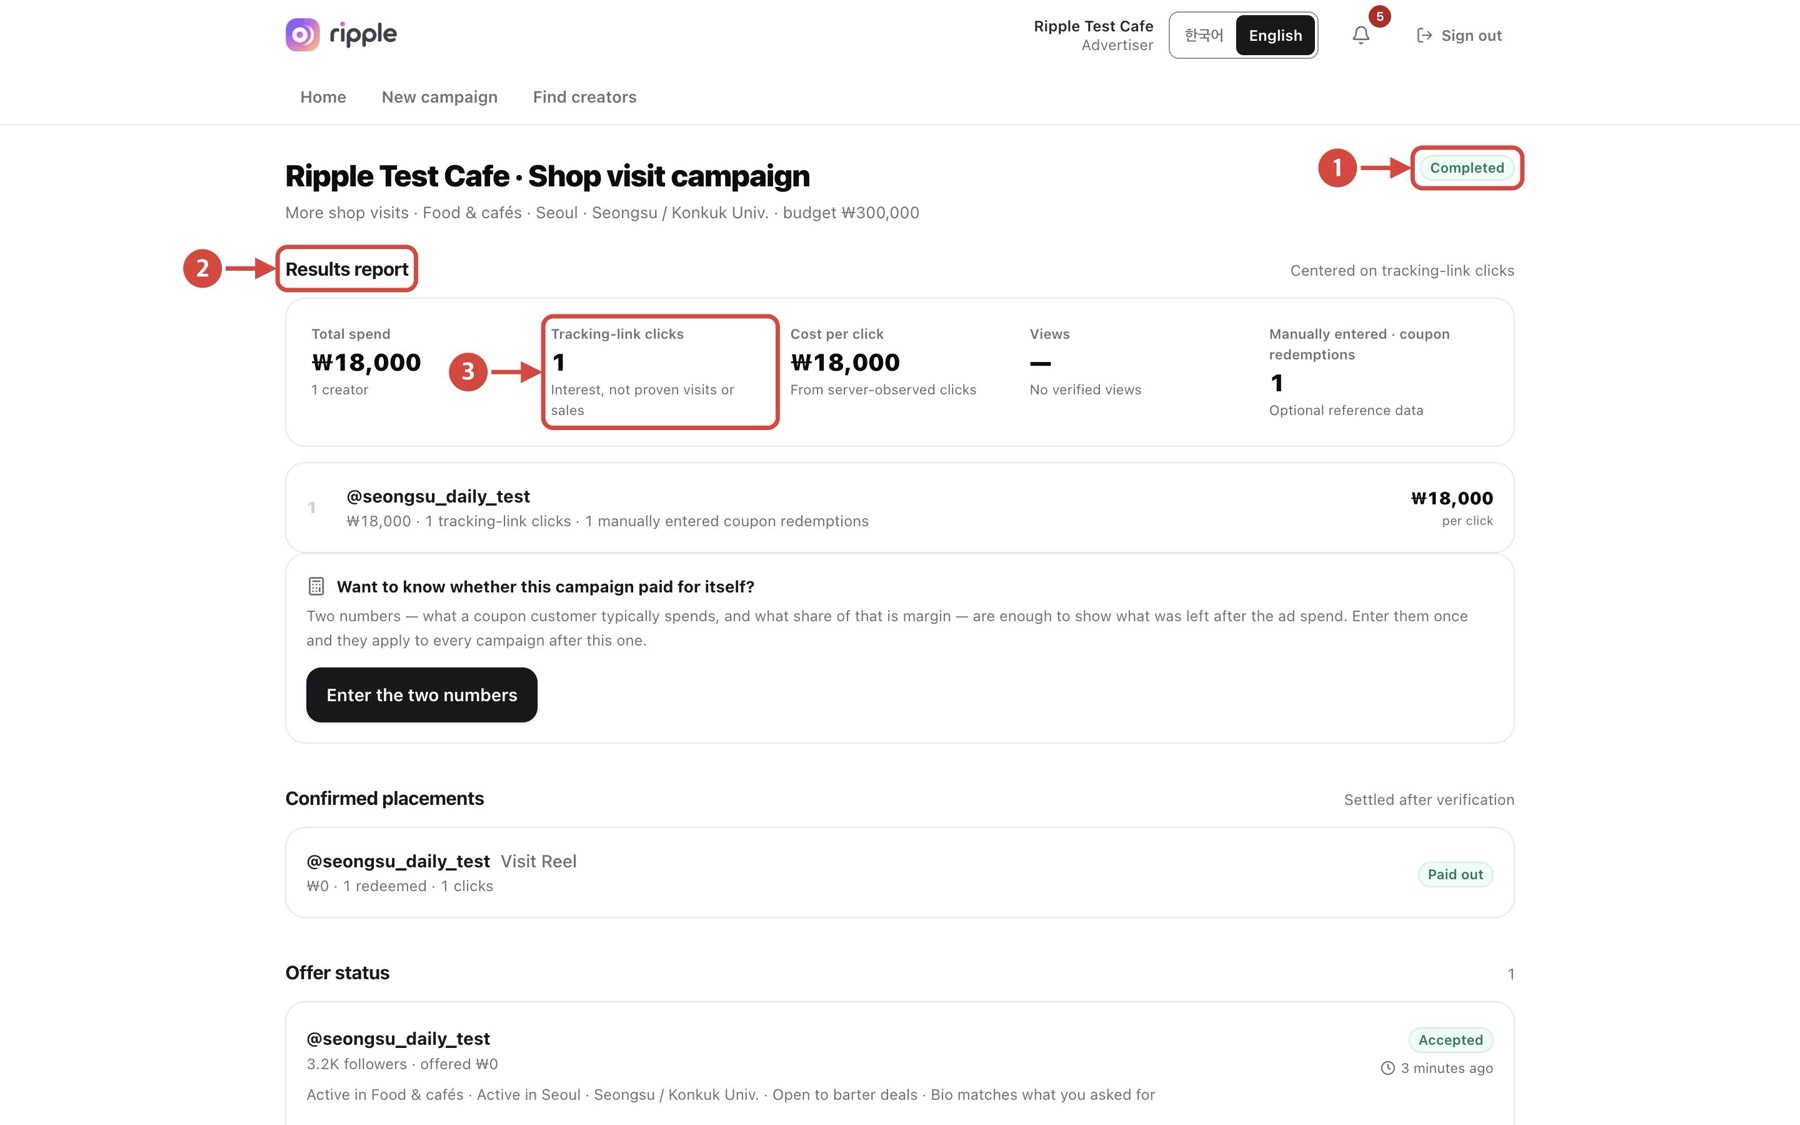
Tap the image to view it full size
- 1Confirm the campaign is “Completed”.
- 2Open the “Results report”.
- 3Check per-creator “Tracking-link clicks”. Clicks show interest, not visits or purchases.
Next Coupon uses entered by staff appear separately as reference data. You can enter average spend and margin for an estimate, but keep it apart from actual sales.
Back to topReview open-campaign applicants
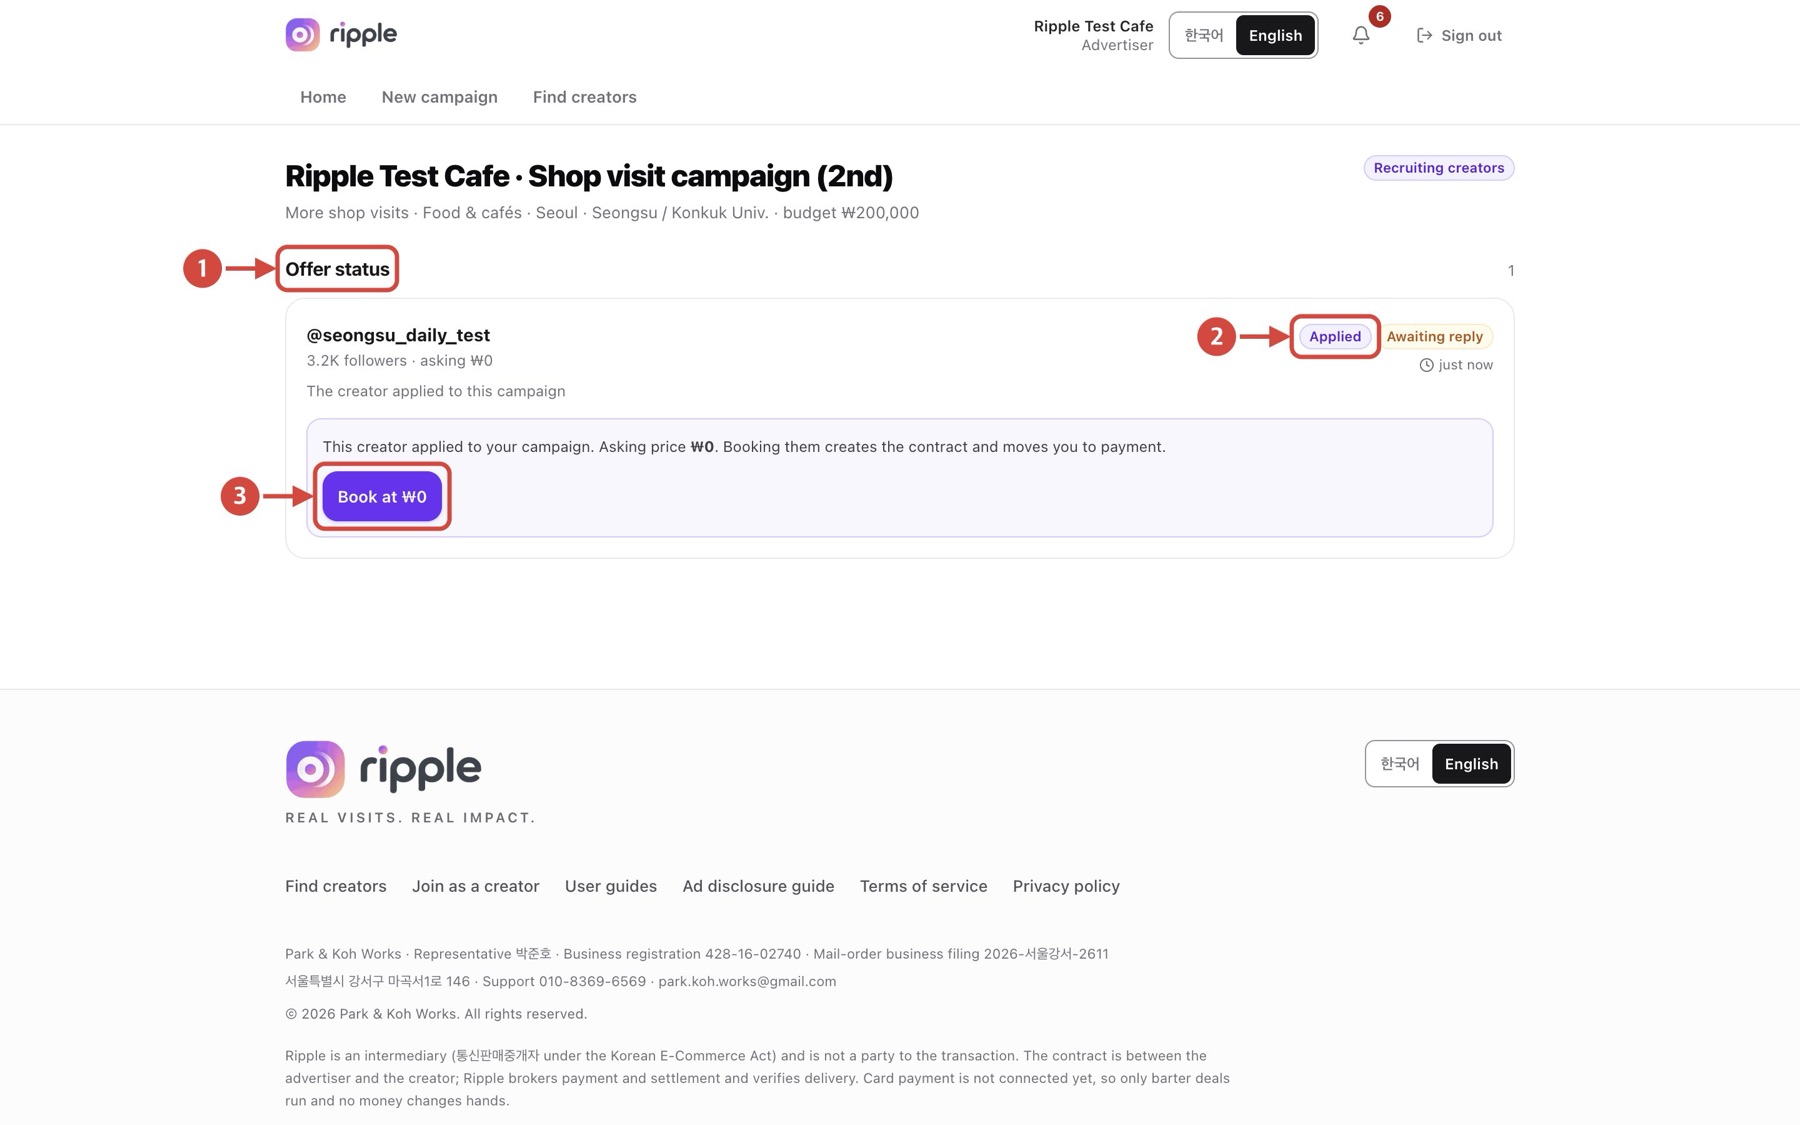
Tap the image to view it full size
- 1Open “Offer status”.
- 2Look for creators marked “Applied”.
- 3Review the profile and select “Book at …”.
Next Booking creates a contract that moves on to booking confirmation.
Back to topRespond to a counteroffer
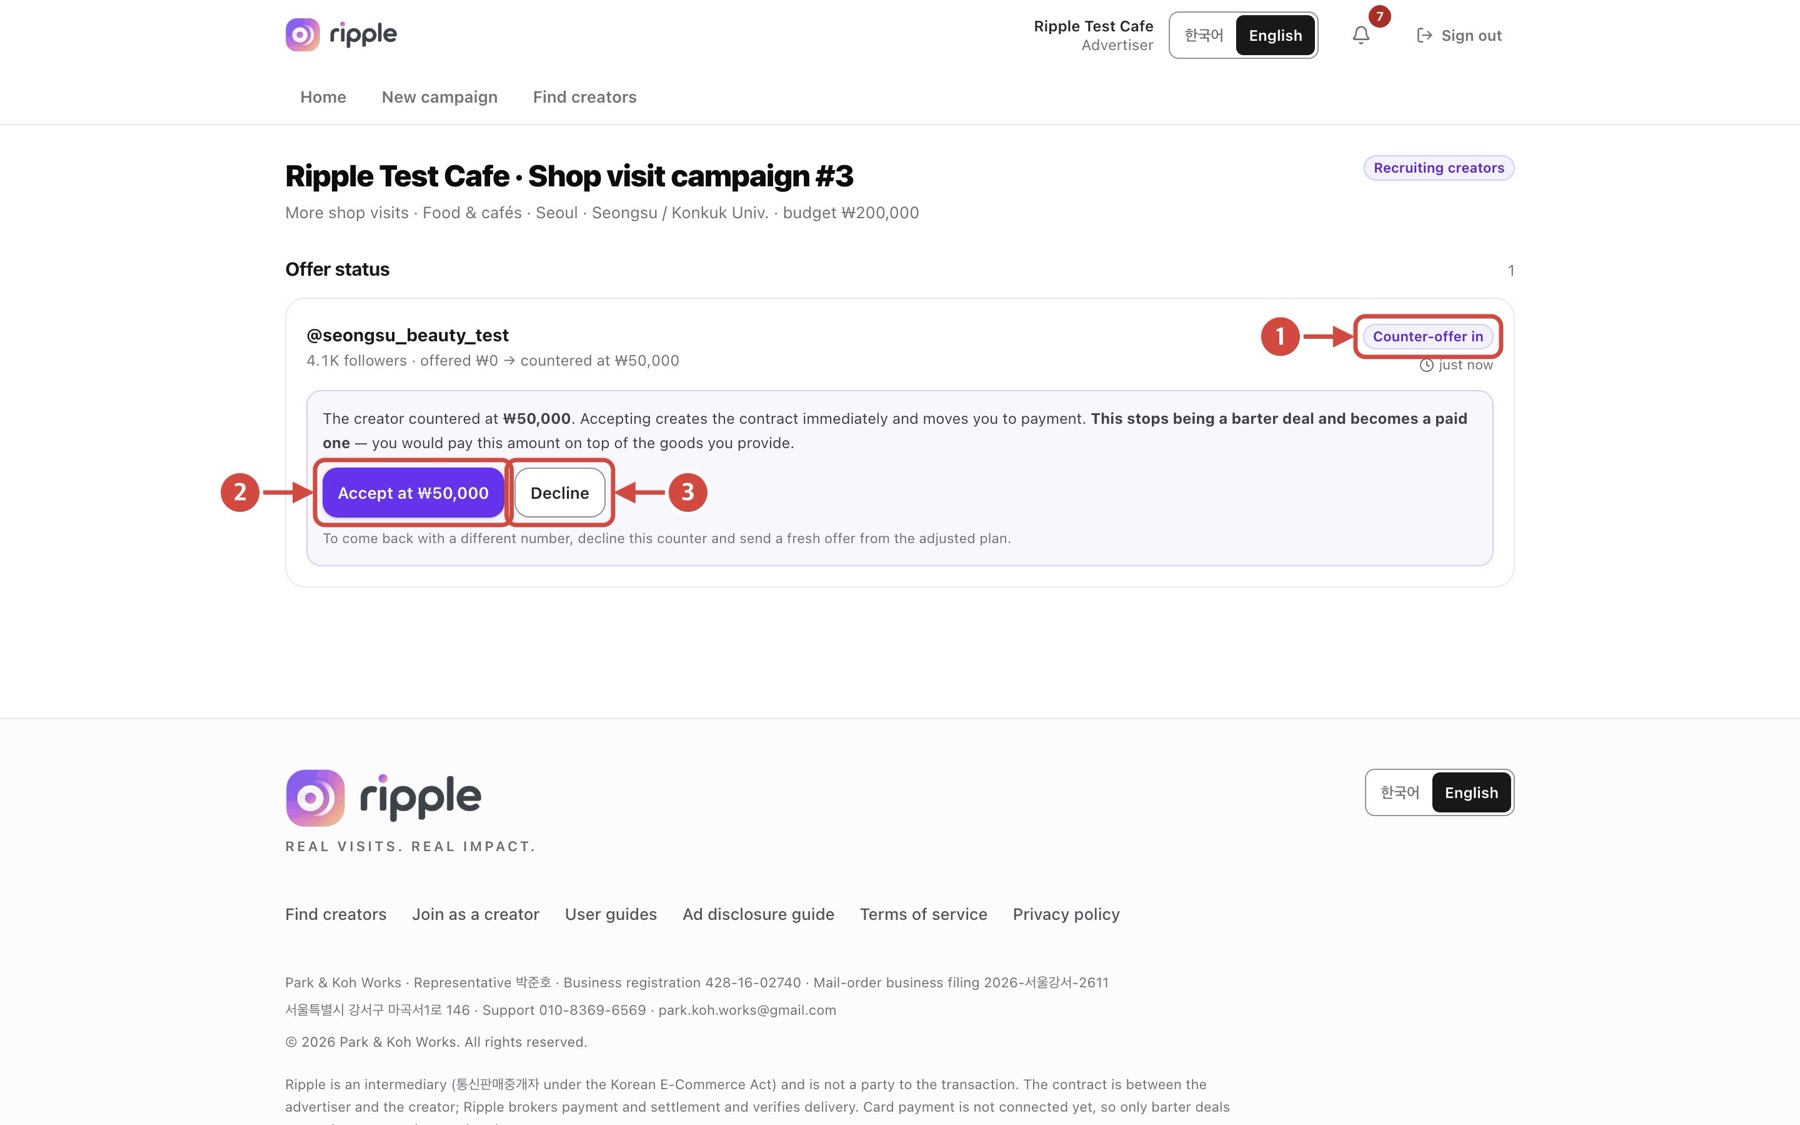
Tap the image to view it full size
- 1Check the “Counter-offer in” status.
- 2Review the amount and select “Accept at …” if it works for you.
- 3Select “Decline” if the terms do not work.
Next Accepting a counteroffer turns the barter deal into a paid-fee contract. Paid-fee deals may be limited depending on payment and payout availability, so check the on-screen notice first.
Back to topReady? Create your first campaign
Curious about the other side? Read the Creator user guide.